DELTA2 Owner's Manual 16 RSF Woodburning Fireplaces
room where the fireplace is installed (see Figure 14).
Some local codes require that the walls be insulated,
vapor sealed and sheathed with a fire rated gypsum
board (see Figure 14). We strongly recommend this
procedure for all installations to prevent cold drafts from
originating in the fireplace enclosure. If you follow this
procedure, we recommend that you do not insulate the
wall above the front of the fireplace.
REMEMBER: Check local codes concerning
installation requirements and restrictions in your area.
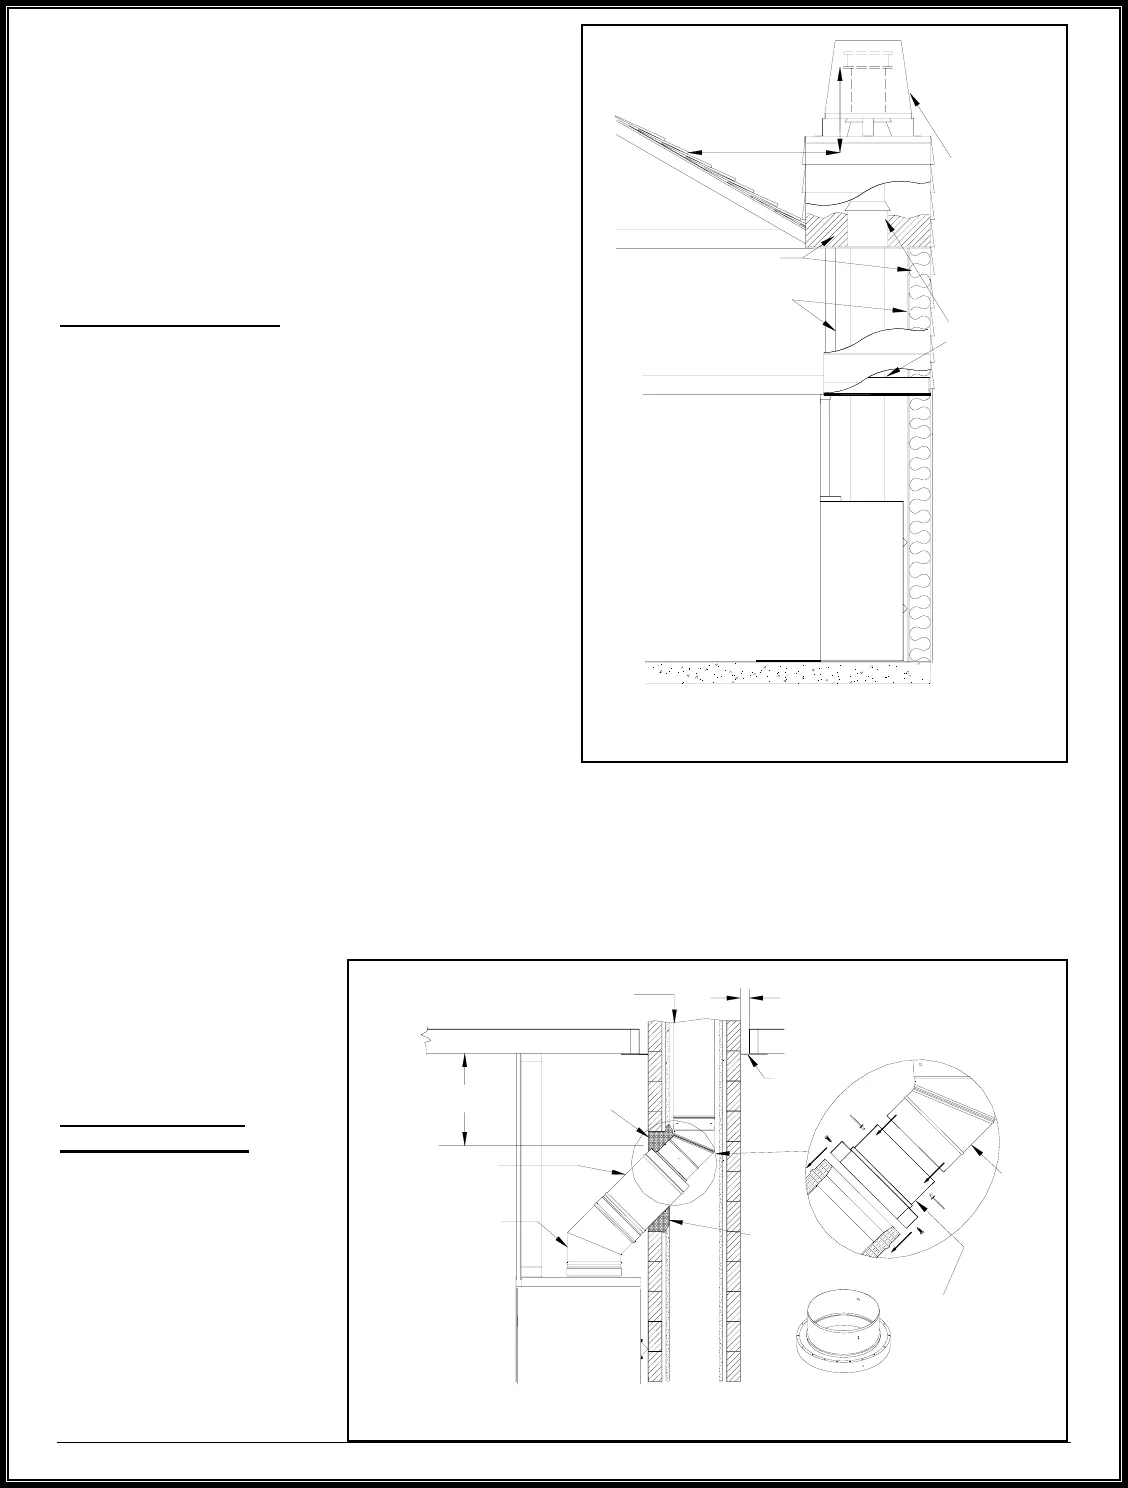
MASONRY CHIMNEY
Installing your DELTA2 fireplace with a masonry
chimney still requires using EXCEL chimney from the
top of the fireplace to the wall where it will connect to a
listed liner that will run up inside the masonry chimney
(see Figure 15).
The stainless steel liner should be fitted inside the clay
liner all the way to the top of the masonry chimney. It is
not meant to replace the clay liner. You can use either
the EXCEL liner or any other listed liner to ULC-S635,
ULC-S640 or UL-1777.
Special care is to be taken to make sure that you have a
good solid connection between the EXCEL chimney and
the liner. A masonry adaptor (FO-FDM8) was designed
specifically for that purpose and is available from your
RSF dealer. It will attach to the liner with 3 stainless
steel rivets (provided) and to the EXCEL chimney with 3
screws (provided).
After mortaring in place, the connection between the EXCEL chimney and the liner should not be visible in order
to isolate the heat released through the liner from the fireplace enclosure.
As depicted in Figure 15, you must install at least one 18" length of EXCEL chimney after the EXCEL chimney
elbow. The uppermost part of the EXCEL chimney - where it enters the masonry chimney - must be a minimum of
12" from the ceiling.
NOTE: If the ceiling is high enough, you can install one or more EXCEL chimney lengths directly on the
fireplace before the elbow.
If you use a flexible liner,
make sure to be careful when
cleaning to ensure that the
stainless steel flexible liner is
not dislodged in any way.
Using an Existing
Masonry Chimney
WARNING: IF YOU ARE
CONSIDERING USING AN
EXISTING CHIMNEY, IT
MUST FIRST BE
THOROUGHLY INSPECTED
BY AN AUTHORITY HAVING
JURISDICTION TO
DETERMINE THE
FOLLOWING:
10'
2' min.
Optional
Decorative
Shroud
Insulation
Chase liner of fire rated
gypsum board is
recommended (may be
required by local authorities)
Radiation
Shield,
with Storm
Collar in
the Attic
R
S
F
Fi
rep
lace
Figure 14 Chimney Installed with a Chase
Enclosure Exam
le
Clearances as per
NBC or NFPA 211
EXCEL liner or other listed liner to
ULC-S635, ULC-S640 or UL-1777
12" min. to
combustible ceiling
EXCEL chimney
lenght: 18" min.
EXCEL chimney
elbow
Masonry Adaptor
FO-FDM8
Metal
Firestop
Liner
Elbow
R
SF
F
ire
p
la
ce
Mortar
Mortar
Figure 15 Connection to a Masonry Chimney


