DELTA2 Owner's Manual 14 RSF Woodburning Fireplaces
CHIMNEY INSTALLATION
Make sure to read the EXCEL Chimney installation manual concerning requirements for supports, bracing,
anchors, etc. The EXCEL installation manual is available from your dealer or from our web site: "www.icc-
rsf.com". Refer to Table 1 (F) for the maximum chimney height that can be supported by the top of the fireplace.
WARNING: THE CLEARANCE BETWEEN THE CHIMNEY AND COMBUSTIBLE MATERIAL MUST BE 2"
OR MORE. DO NOT FILL THIS AREA WITH INSULATION.
1. Cut and frame the required holes in the floor(s), ceiling(s) and roof where the chimney will pass through. The
rough opening in the framing is 14" square (the opening can be slightly bigger, up to 14 ½", but NEVER
smaller).
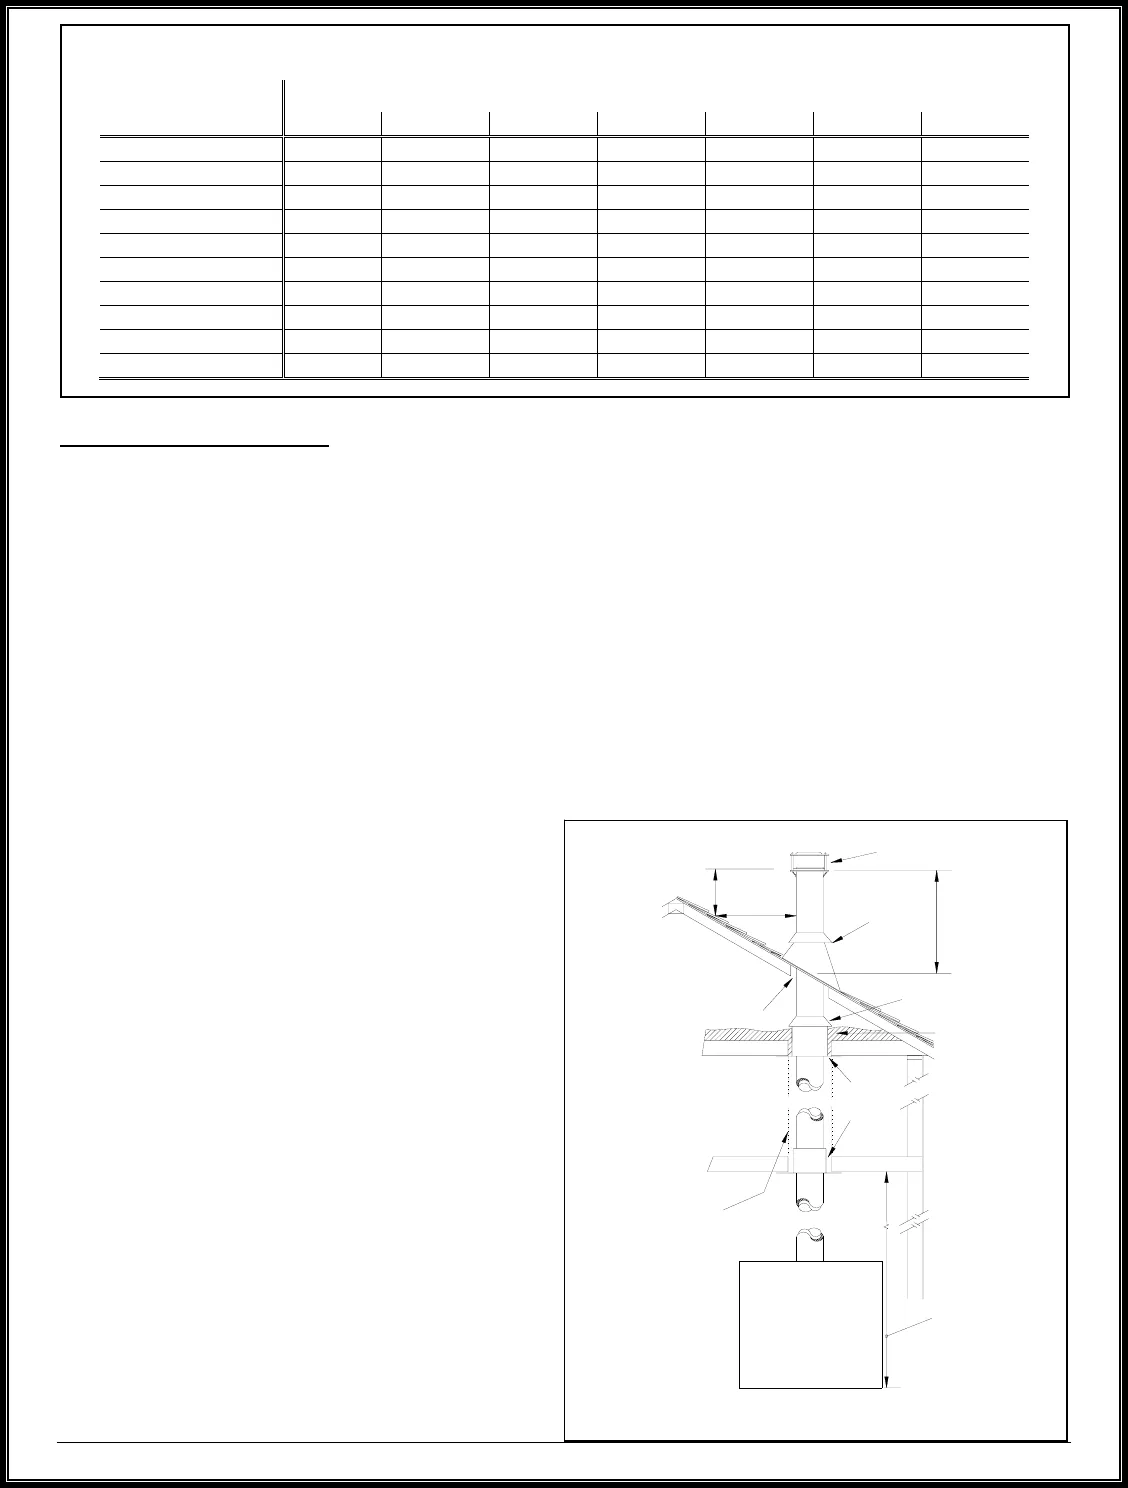
2. From below, install a radiation shield in each floor through which the chimney passes. At the attic level, install
a radiation shield and a storm collar as shown in Figure 11.
WARNING: A RADIATION SHIELD MUST BE INSTALLED AT EACH FLOOR WHERE THE CHIMNEY
PASSES THROUGH.
3. Place the first chimney length on the fireplace.
Secure the chimney length to the fireplace with the
three screws provided.
The chimney must extend at least 3' above its
point of contact with the roof and at least 2' higher
than any wall, roof, or building within 10' of it. If the
chimney is higher than 5' above the roof, it must
be secured using a roof brace.
4. Put the roof flashing into place. Seal the joint
between the roof and the flashing with roofing tar.
For sloping roofs, place the flashing under the
upper shingles and on top of the lower shingles.
Nail the flashing to the roof using roofing nails.
If the chimney is enclosed to the roof:
• In USA: use a vented flashing;
• In Canada: use a vented flashing, or a roof
radiation shield with a regular flashing.
5. Place the storm collar over the chimney and
flashing. Seal it around the chimney with silicone
sealer (DO NOT use roofing tar).
6. Fit the rain cap on the chimney. Secure it tightly in
place.
Table 2 Minimum Recommended Flue Heights In Feet From The Top Of The Fireplace
Number Of Elbows
Elevation (ft)
0 2 x 15° 4 x 15° 2 x 30° 4 x 30° 2 x 45° 4 x 45°
0 - 1000 12’ 13’ 14’ 15’ 18’ 16’ 20’
1000 - 2000 12’6” 13’6” 14’6” 15’6” 19’ 16’6” 20’
2000 - 3000 13’ 14’ 15’ 16’ 19’6” 17’ 21’6”
3000 - 4000 13’6” 14’6” 15’6” 17’ 20’ 18’ 22’6”
4000 - 5000 14’ 15’ 16’ 17’6” 21’ 18’6” 23’
5000 - 6000 14’6” 15’6” 17’ 18’ 21’6” 19’ 24’
6000 - 7000 15’ 16’ 17’6” 18’6” 22’ 20’ 24’6”
7000 - 8000 15’6” 16’6” 18’ 19’ 23’ 20’6” 25’6”
8000 - 9000 16’ 17’ 18’6” 20’ 24’ 21’ 26’6”
9000 - 10000 16’6” 17’6” 19’ 20’6” 24’6” 22’ 27’
R
S
F
F
i
r
e
p
l
a
c
e
Radiation
Shield
Rain Cap
Flashing with
Storm Collar
3' min.
10'
2' min.
Storm Collar
in the Attic
Ceiling
Clearance (see
Table 1 (C))
The chimney
must be enclosed
when it passes through
living spaces: min.
clearance of 2" with
chimney
2" min.
NOTE: Openings
must be framed to
adequately support
any chimney
supports and roof
assemblies
WARNING:
DO NOT PACK
REQUIRED AIR
SPACES WITH
INSULATION OR
OTHER
MATERIALS
WARNING:
MAJOR RISK
OF FIRE,
LOOSE FILL
INSULATION
MUST NOT GO
ABOVE THE
RADIATION
SHIELD AND
MUST NEVER
COME IN
CONTACT
WITH THE
CHIMNEY
Fi
ure 11 General Chimne
Installation


