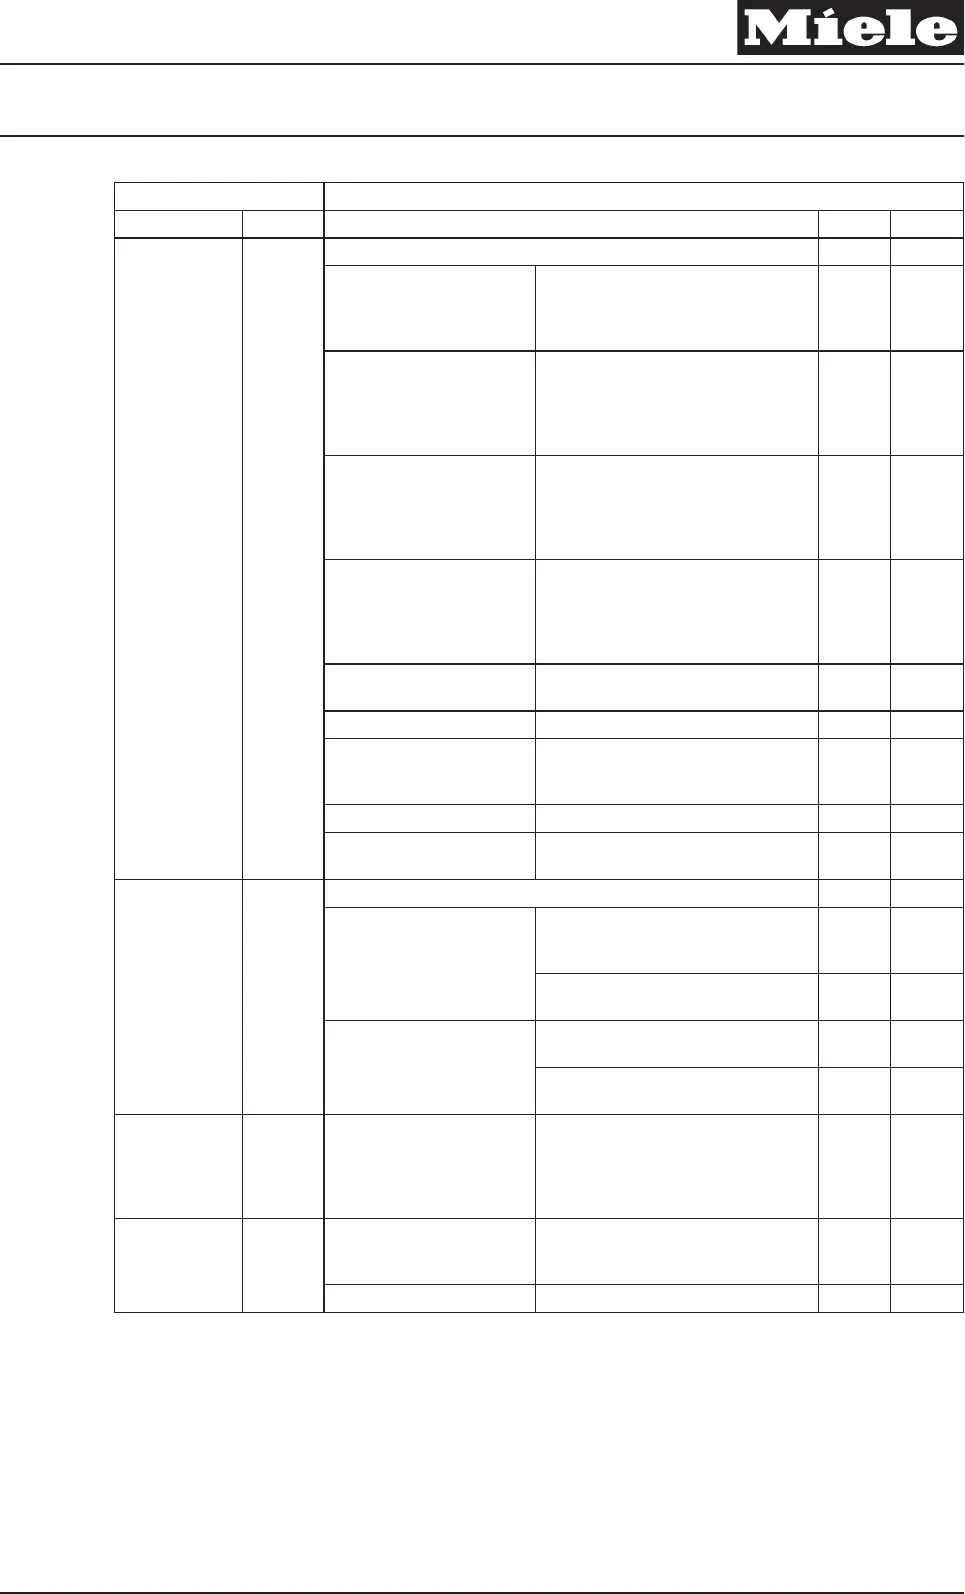
Service function
Option
Buzzer LED short Prewash LED long short
Component
test
3)
2 all components inactive - -
Water path control (M 24)
position 1, only if present and
water intake valve (Y1 or Y14
/ Y40 with water path control)
Water run over the porthole for 10
seconds
- 1
Water path control (M 24)
position 2, water intake valve
(Y1 or Y14 / Y40 with water
path control), Heater, Analog
pressure sensor
Water run via compartment I up to level
I. Heating, starting at level I, to 95°F
(35°C)
- 2
Water path control M 24
position 3, water intake valve
(Y2 or Y14 / Y40 with water
path control), Analog
pressure sensor
Water run via compartment II up to
level II
- 3
Water path control (M 24)
position 4, water intake valve
(Y1 and Y3, or Y14 / Y40
with water path control),
Analog pressure sensor
Water run via compartment III up to
level III (fabric softener compartment)
- 4
Drain pump (M8) Activate drain pump, drainage
independent of level
- 5
Motor drum drive (M5) Activate drum, rotation, wash - 6
Motor drum drive (M5) Drain
pump (M8)
Drum drive, spin speed limited
according to program selection. Drain
pump on / Drain valve open.
- 7
Drum light (H3/6) (optional) Drum light on - 8
Hot water valve (Y12 / 2Y40)
(optional)
Water run via compartment II up to
level III.
- 9
Sensor test
4)
070 2.4.2
Sensor test
3 all sensors inactive - -
Float switch (B8) in the sump No water in the sump => float not
activated => switch closed = > Buzzer
on
- 1
Float activated => switch open = >
Buzzer off
- 2
Door contact (A2) Door closed => Switch closed = >
Buzzer on
- 1
Door open => Switch open = > Buzzer
off
- 2
Operating
hours 070 2.4.3
Operating hours
meter
4 Power electronic (ELP).
Operating hours
Long flashing signal for the number of
1000s, short flashing signal for the
number of 100s. (12 times long + 6
times short = 12000 h + 600 h = 12600
h.
x000 h y00 h
Operating070
2.4.4 Operating
5 Keypads Tone to acknowledge when pad is
pressed, and the LED corresponding to
the pad lights up.
- -
Buzzer Tone signal - -
Table 5: Service Mode Overview
1)
Indicate fault checks in ascending order: Press Start.
2)
To delete the fault memory:Press Start pad longer than 4 seconds (all saved faults are deleted).
3)
To select and activate components: Press Start, after 1 second, activation follows automatically. Pressing Start again
switches the current component off and starts the next one. If component testing is stopped and subsequently called up
again, the program resumes with the last component that was activated. The component test switches off automatically
30 minutes after the last component is activated.
4)
To select a sensor and start the check: Press Start.
Descriptive Technical Documentation
070-48 DTD no. 11-4800
This information should not be duplicated or passed on without Miele approval. All rights reserved. 22.12.2006, US_am


