1. Cut and frame the required holes in the floor, ceiling
and roof where the chimney will pass through. Use a
plumb bob. The framing size is 14 1/4” square.
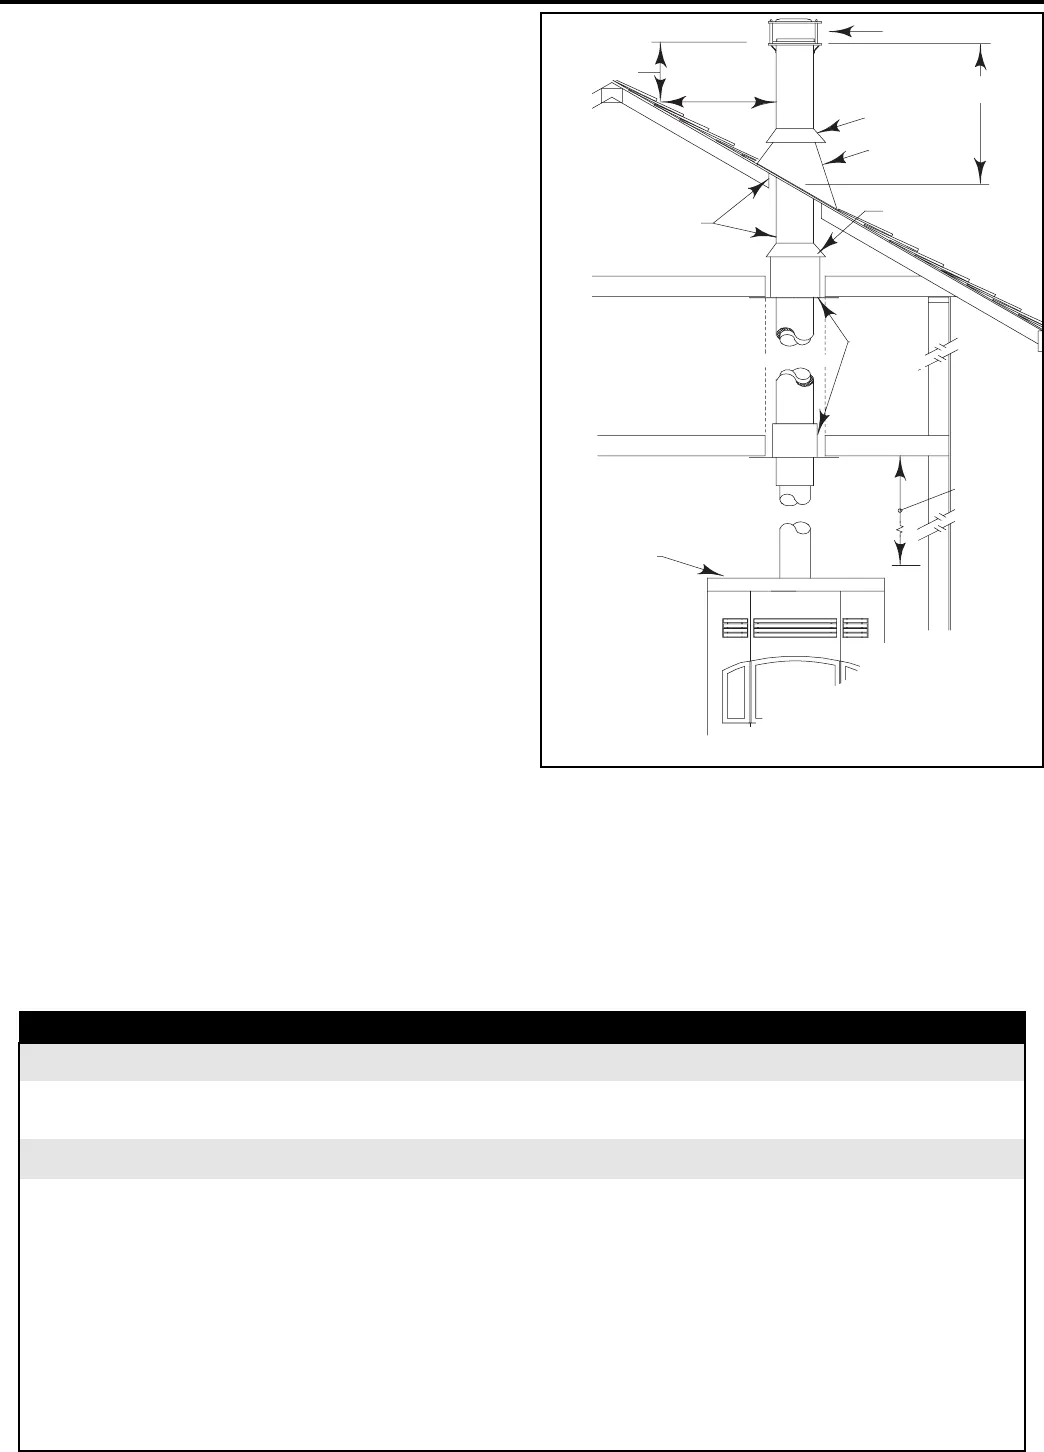
2. From below, install a radiation shield in each floor
through which the chimney passes. At the attic level,
install a storm collar above the radiation shield as
shown in (Figure 8).
3. Place the first chimney length on the fireplace.
Secure the chimney length to the fireplace with the
three screws provided.
The chimney must extend at least 3 ft. above its point
of contact with the roof and at least 2 ft. higher than
any wall, roof, or building within 10 ft. of it. Refer to the
Excel instruction installation flue height requirements
for penetration above a chase.
If the chimney is higher than 5 ft. above the roof, it
must be secured using a roof brace.
4. Put the roof flashing into place. Seal the joint between
the roof and the flashing with roofing tar. For sloping
roofs, place the flashing under the upper shingles and
on top of the lower shingles. Nail the flashing to the
roof using roofing nails.
If the chimney is enclosed to the roof:
USA: use a vented flashing
Canada: use a roof radiation shield (ERRS)
and a regular flashing
5. Place the storm collar over the chimney and flashing.
Seal it around the chimney with silicone sealer (DO
NOT use roofing tar).
6. Fit the rain cap on the chimney. Secure it tightly in
place.
7. Wash the roof flashing with solvent (or vinegar if the
flashing is galvanized), then paint it with exterior
paint.
Read the Excel Chimney installation manual concerning
requirements for supports bracing anchors, etc.
CHASE ENCLOSURE
If the chimney runs up the outside of the house, it must
Page 10
DELTA
rain cap
3’ min.
storm
collar
roof flash-
ing
storm collar
radiation
shield
2" min.
Warning: Do not fill the air
space between the chimney
and the radiation shield. The
chimney must be enclosed
in a chase when it passes
through a living space.
Maintain 2” of clearence to
combustible form the chim-
ney
Delta
Follow the installa-
tion instructions
for EXCEL chim-
ney to get the size
of the opening
Figure 8: Chimney installation
10 feet min.
2 feet min.
39½"
min (84"
from
base to
ceiling)
TABLE 1
MINIMUM RECOMMENDED FLUE HEIGHTS IN FEET FROM THE TOP OF THE FIREPLACE
ELEVATION NUMBER OF ELBOWS
(FEET) 0 2x15° 4x15° 2x30° 4x30° 2x45° 4x45°
0 - 1 000 12’ 13’ 14’ 15’ 18’ 16’ 20’
1 000 - 2 000 12’6” 13’6” 14’6” 15’6” 19’ 16’6” 20’
2 000 - 3 000 13’ 14’ 15’ 16’ 19’6” 17’ 21’6”
3 000 - 4 000 13’6” 14’6” 15’6” 17’ 20’ 18’ 22’6”
4 000 - 5 000 14’ 15’ 16’ 17’6” 21’ 18’6” 23’
5 000 - 6 000 14’6” 15’6” 17’ 18’ 21’6” 19’ 24’
6 000 - 7 000 15’ 16’ 17’6” 18’6” 22’ 20’ 24’6”
7 000 - 8 000 15’6” 16’6” 18’ 19’ 23’ 20’6” 25’6”
8 000 - 9 000 16’ 17’ 18’6” 20’ 24’ 21’ 26’6”
9 000 - 10 000 16’6” 17’6” 19’ 20’6” 24’6” 22’ 27’