Shure UC2 Hand-Held UHF Transmitter
12
Service Procedures
25C1044 (TK)
Test Set-Up
1. Desolder the printed circuit boards (pcbs) and pull them apart.
When the pcbs are desoldered, leave the battery contacts
soldered to the audio board for powering up the unit.
2. Remove C347 and connect the respective RF test cable between
TPRF1 / RF GND and a frequency counter.For Japan models
with PCB version “N” and earlier, do not remove C347. Connect
a 95C8418 cable between J2 and the frequency counter.
3. Use the PT1843 cable to connect the audio board to the rf board
through the 11-pin board interconnects (J200, J300, side 2).
4. Set the audio GAIN potentiometer (R207, side 1) to minimum,
full counter-clockwise (CCW).
5. Apply + 9 Vdc across the battery terminals (J201, J202, side 2).
6. Toggle the power switch, S200, to turn on the UC2 transmitter.
7. Set the UC2 Group and Channel switches, S301 and S302,
according to the group designators on the board and the
settings given in Table 2.
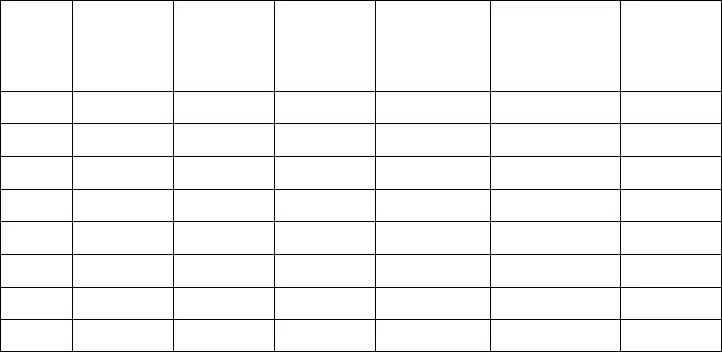
Table 2
Group Carrier Frequencies and Tuning Voltages
(in order by carrier frequency)
Group
Group
Code
Group
Switch
(S101)
Channel
Switch
(S102)
Carrier
Frequency
(MHz)
VCO Tuning
Voltage
(TP30)
Deviation
(kHz)
UA A 4 0 805.500 3.7 45
UB F 1 A 703.750 2.6 45
MB B 1 3 805.500 2.2 15
JA C 0 2 805.500 3.7 5
JB D 4 2 807.500 3.8 5
KK E 5 5 851.125 2.9 15
MC B 1 1 774.125 1.3 ±0.25 15
MD B 3 7 805.500 2.2 15
Table 2 lists the group carrier frequencies, switch settings,
and tuning voltages for all the alignment tests that follow.


