4 Place the shaver body in the holder behind the two clips (1) and
press it down until it locks into place (2).
Note: The shaver cannot be placed in the Jet Clean System when the protection
cap is on the shaving unit or when the trimmer is placed on the shaver.
The display shows that the shaver is charging (see chapter ‘The ,
display’).
Using the shaver
Shaving
Skin adaptation period
Your fi rst shaves may not bring you the result you expect and your skin
may even become slightly irritated. This is normal. Your skin and beard need
time to adapt to any new shaving system.
We advise you to shave regularly (at least 3 times a week) for a period of
3 weeks to allow your skin to adapt to the new shaver. During this period,
use your new electric shaver exclusively and do not use other shaving
methods. If you use different shaving methods, it is more diffi cult for your
skin to adapt to the new shaving system.
1 Press the on/off button once to switch on the shaver.
RQ1187CC, RQ1187: The display lights up for a few seconds. ,
2 Move the shaving heads over your skin in circular movements.
Do not make straight movements. -
3 Press the on/off button once to switch off the shaver.
RQ1187CC, RQ1187: The display lights up for a few seconds and ,
then shows the remaining battery capacity.
Wet shaving
You can also use this shaver on a wet face with shaving foam or shaving gel.
To shave with shaving foam or shaving gel, follow the steps below:
1 Apply some water to your skin.
2 Apply shaving foam or shaving gel to your skin.
3 Rinse the shaving unit under the tap to ensure that the shaving unit
glides smoothly over your skin.
4 Press the on/off button once to switch on the shaver.
5 Move the shaving heads over your skin in circular movements.
Note: Rinse the shaver under the tap regularly to ensure that it continues to
glide smoothly over your skin.
6 Dry your face and thoroughly clean the shaver after use (see chapter
‘Cleaning and maintenance’).
Note: Make sure you rinse all foam or shaving gel off the shaver.
Using the trimmer (RQ1187 only)
You can use the trimmer to groom your sideburns and moustache.
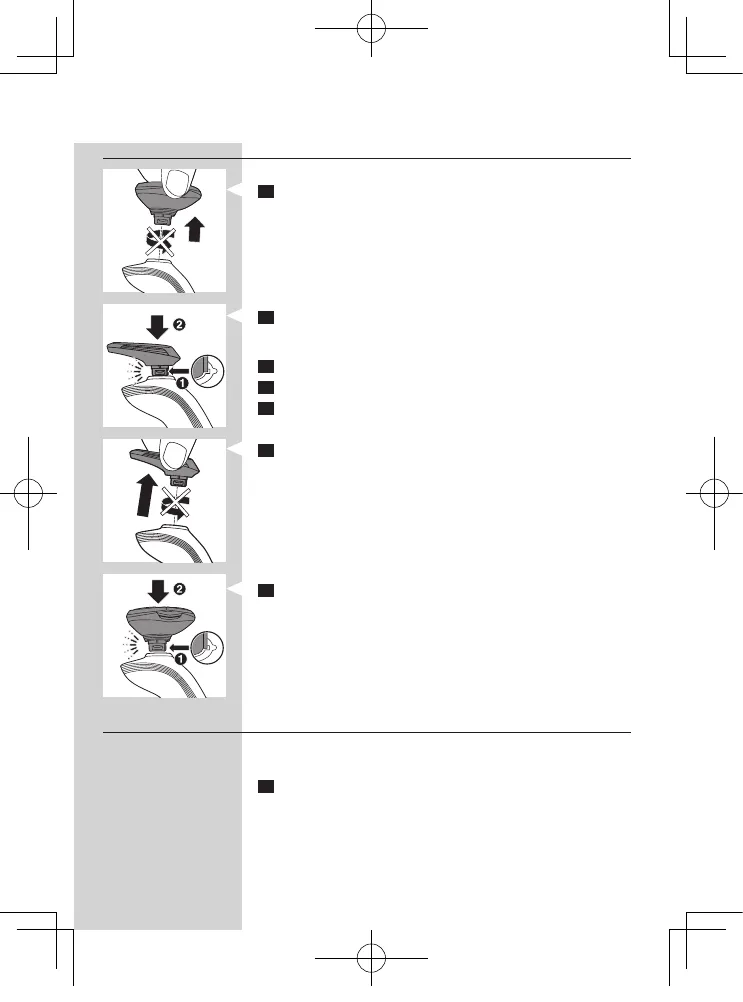
1 Pull the shaving unit straight off the shaver.
Note: Do not twist the shaving unit while you pull it off the shaver.
2 Insert the lug of the trimmer into the slot in the top of the shaver
(1). Then press down the trimmer (2) to attach it to the shaver
(‘click’).
3 Press the on/off button once to switch on the trimmer.
4 You can now start trimming.
5 Press the on/off button once to switch off the trimmer.
6 Pull the trimmer straight off the shaver.
Note: Do not twist the trimming unit while you pull it off the shaver.
7 Insert the lug of the shaving unit into the slot in the top of the shaver
(1). Then press down the shaving unit (2) to attach it to the shaver
(‘click’).
Using the Beard Styler attachment (RQ1187CC only)
Note: Only use the Beard Styler attachment to trim facial hair (beard,
moustache and sideburns). Do not use it to trim body parts below the neckline.
1 Make sure the shaver is switched off.
ENGLISH ENGLISH
4 Place the shaver body in the holder behind the two clips (1) and
press it down until it locks into place (2).
Note: The shaver cannot be placed in the Jet Clean System when the protection
cap is on the shaving unit or when the trimmer is placed on the shaver.
The display shows that the shaver is charging (see chapter ‘The ,
display’).
Using the shaver
Shaving
Skin adaptation period
Your fi rst shaves may not bring you the result you expect and your skin
may even become slightly irritated. This is normal. Your skin and beard need
time to adapt to any new shaving system.
We advise you to shave regularly (at least 3 times a week) for a period of
3 weeks to allow your skin to adapt to the new shaver. During this period,
use your new electric shaver exclusively and do not use other shaving
methods. If you use different shaving methods, it is more diffi cult for your
skin to adapt to the new shaving system.
1 Press the on/off button once to switch on the shaver.
RQ1187CC, RQ1187: The display lights up for a few seconds. ,
2 Move the shaving heads over your skin in circular movements.
Do not make straight movements. -
3 Press the on/off button once to switch off the shaver.
RQ1187CC, RQ1187: The display lights up for a few seconds and ,
then shows the remaining battery capacity.
Wet shaving
You can also use this shaver on a wet face with shaving foam or shaving gel.
To shave with shaving foam or shaving gel, follow the steps below:
1 Apply some water to your skin.
2 Apply shaving foam or shaving gel to your skin.
3 Rinse the shaving unit under the tap to ensure that the shaving unit
glides smoothly over your skin.
4 Press the on/off button once to switch on the shaver.
5 Move the shaving heads over your skin in circular movements.
Note: Rinse the shaver under the tap regularly to ensure that it continues to
glide smoothly over your skin.
6 Dry your face and thoroughly clean the shaver after use (see chapter
‘Cleaning and maintenance’).
Note: Make sure you rinse all foam or shaving gel off the shaver.
Using the trimmer (RQ1187 only)
You can use the trimmer to groom your sideburns and moustache.
1 Pull the shaving unit straight off the shaver.
Note: Do not twist the shaving unit while you pull it off the shaver.
2 Insert the lug of the trimmer into the slot in the top of the shaver
(1). Then press down the trimmer (2) to attach it to the shaver
(‘click’).
3 Press the on/off button once to switch on the trimmer.
4 You can now start trimming.
5 Press the on/off button once to switch off the trimmer.
6 Pull the trimmer straight off the shaver.
Note: Do not twist the trimming unit while you pull it off the shaver.
7 Insert the lug of the shaving unit into the slot in the top of the shaver
(1). Then press down the shaving unit (2) to attach it to the shaver
(‘click’).
Using the Beard Styler attachment (RQ1187CC only)
Note: Only use the Beard Styler attachment to trim facial hair (beard,
moustache and sideburns). Do not use it to trim body parts below the neckline.
1 Make sure the shaver is switched off.
ENGLISH ENGLISH
RQ1187CC-87-67_EN_A6_CS3.indd 40 13.5.13 2:44:31 PM


