12
Pairing the Microphone to the Charger Base
“Pairing” creates an association between the Wireless Microphone
and the Charger Base with a unique electronic serial number.
When the Microphone and Charger Base have been previously
paired, the Microphone will automatically try to connect to the
Charger Base whenever it is lifted from the Charger Base.
Remember, the Microphone is always muted (flashing RED
LED) when it is removed from the Charger Base and the MUTE
button needs to be pressed to make it “live” (flashing GREEN
LED).
The Microphone in new systems come paired to the Charger Base.
However, if a replacement Microphone is ever required, it will need
to be manually “paired.”
If a Microphone is lifted from the Charger Base and the
Microphone LED slowly flashes alternating RED and GREEN for
10 seconds, it means that the Microphone needs to be paired to
the system.
Microphone Pairing Instructions
1. Make sure the Microphone is turned OFF (no LED activity). If
the unit is ON, press and hold the MUTE button for 10 seconds
until the LED turns solid RED (do not release when you hear
two beeps), to turn the unit off, if needed. An alternative
method of turning off is to place the Microphone in the Charger
Base for less than 2 seconds.
2. Place the Microphone into pairing mode by holding the
Microphone’s MUTE button down for ten seconds. The LED will
turn solid GREEN and then solid RED. Release the MUTE
button. The Microphone unit is now in pairing mode.
3. Within 5 seconds, push and hold the Charger Base’s MUTE
button for six seconds to enter into pairing mode. The LED will
be solid RED until pairing is confirmed, as indicated by a short
GREEN flash followed by flashing RED on both the
Microphone and the Charger Base. If pairing fails on either
unit, the LED will flash alternately GREEN and RED for a few
seconds.
13
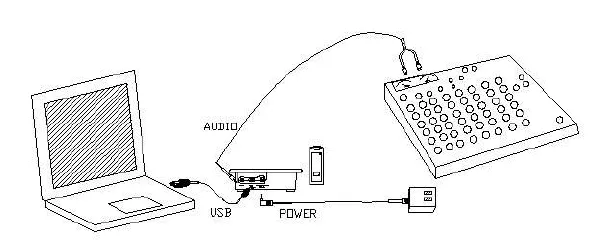
Installation
The Revolabs Solo™ Desktop system is easily installed into either
the office or conference room environment. Simply plug the power
supply into a convenient outlet and attach the USB cable to a
computer or laptop, or connect the 2.5mm audio cables to an audio
system.
Computer Software Set-up
Use the supplied cable to connect the mini USB connector to the
Charger Base and the standard end to your computer USB port.
Your computer will alert you that it has found new hardware, and
the solo-Desktop operating software will automatically load.
It is possible to configure your computer settings to playback audio
through the earpiece attached to the microphone (default settings)
or through the computer speakers (internal or desktop). The
examples shown below are using the Windows XP Operating
System Classic settings - other Windows operating systems might
look slightly different.


