Use A Non-Hardening Gasket Sealer
Sealers are NOT required on FEL-PRO PermaTorque
®
head gaskets. However, embossed
steel shim, copper-faced, or steel-faced gaskets should be coated with a non-hardening
automotive gasket sealer as a supplemental seal.
Lightly coat bolt threads and the underside of the bolt heads with EP grease or similar
lubricant. When they enter the water jackets of an engine, bolt threads should be coated with
a non-hardening automotive sealer to prevent leakage. Refer to the manufacturer’s service
manual or examine the engine to determine where the bolt holes lead.
Watch Bolt Lengths and Sizes
Head bolts on some engines may vary in length and size, and it is important that they be
replaced in their original location. Either mark the bolts by position, or place them on a
bench in the order you remove them.
Use A Torque Wrench
Uneven torque can cause block distortion and head warpage, resulting in coolant or
combustion leaks. Use a good torque wrench, properly calibrated, and follow exact
specifications for the proper torque. The basic tightening procedure is to first snug up
bolts, then tighten in stages, and then complete with the final torque specified.
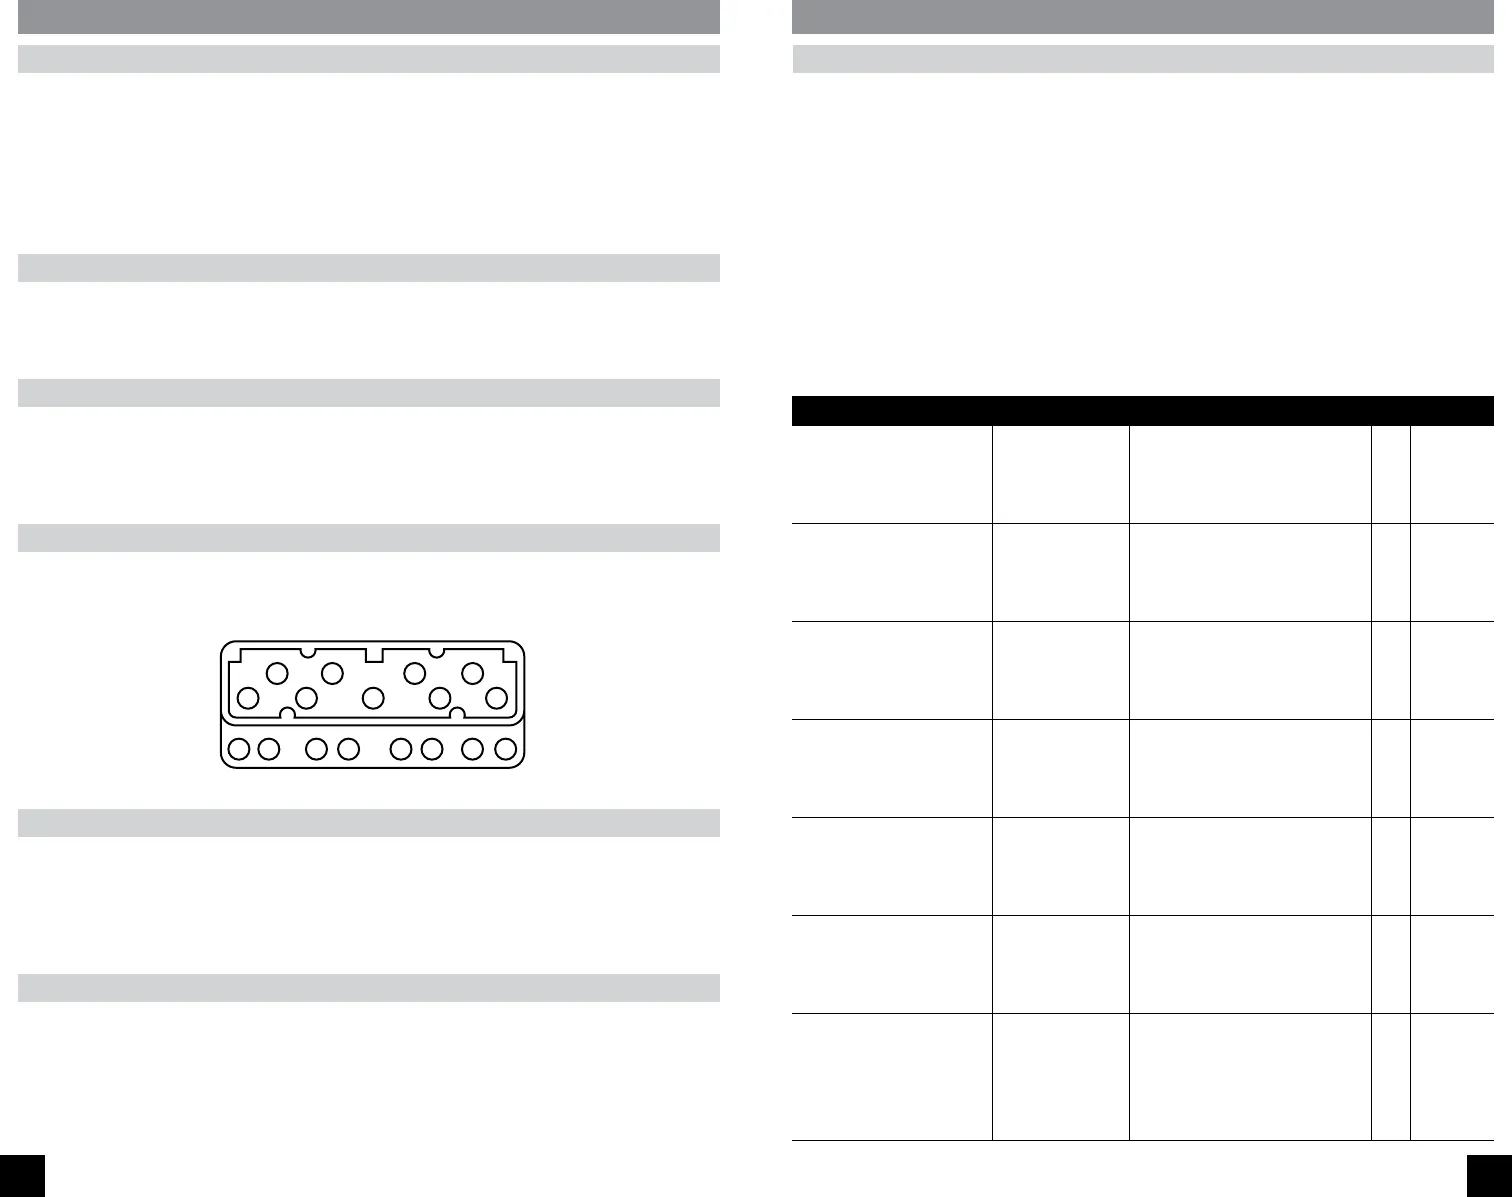
Follow Torquing Sequences
Each manufacturer has an approved torquing sequence to follow for each engine, to insure
the best possible seal and eliminate chances of distortion and warpage. In general, the
sequence starts at the center and spirals out to the ends of the head.
Warm Engine and Retorque Head
Run the engine to normal operating temperature after torquing head bolts. Heat expansion
and contraction can radically change the torque readings. Retorque all head bolts to the
correct settings while the engine is still warm. If working with aluminum components, let
the engine cool completely first. Remember that FEL-PRO
®
PermaTorque
®
designs do
NOT require retorquing.
Retorque After 300 to 500 Miles
If retorque-type head gaskets are used, retorque after 300 to 500 miles.
1
2
3 4
5
6
7
8
910
11
1213
14
1
23
4 5
67
8 9
10
11
12
13
14
1
2
3
4
5
6
7
8
9
10
123 4 5
678 9 10
1
2
3
45
6
7
89
10
FRONT
FRONT
1
2
3
4
5
6
7
8 9
10
11
12
13
14
15
16
17
18
19
20
1
2
34
5
6
78
9
10
1112
13
14
1516
17
CYLINDER HEAD GASKET INSTALLATION TIPS
Torque-to-Yield Head Bolts
Torque-to-yield is a method used by most current engine manufacturers to tighten head
bolts. The head bolts are torqued to their yield point, which may permanently stretch the
bolts. This results in a more even clamping force over the entire area of the gasket. Bolts
should first be tightened to a specified torque (measured in foot-pounds), and then tightened
an additional partial turn (measured in degrees) to the bolt yield point. The inexpensive
FEL-PRO
®
Torque-to-Angle Indicator (part number TRQ-1) will help you accurately
measure the required partial turn in degrees.
Because the head bolts may have stretched, the engine manufacturer may recommend
against reusing them. Consult the OEM manual on head bolt reuse. Since you may not
know how many times a T-T-Y bolt has been removed and reinstalled, FEL-PRO engineers
suggest that it is always a good idea to use new bolts. FEL-PRO head bolt sets are available
for many domestic and imported engines. The Torque Tables™ indicate which engines
have bolt sets offered in the FEL-PRO product line.
FEL-PRO
®
T-T-Y HEAD BOLTS
ENGINE YEARS FT.-LBS.
TORQ.
SEQ.
HEAD BOLT SET
PART NUMBER
FORD PRODUCTS 6 & V6 (CONT.)
232 OHV (3.8L) 12 Valve Ford 2003-96 Truck
●❍
1st 15, 2nd 29, 3rd 37,
PERFORM THE NEXT THREE STEPS ON
EACH BOLT BEFORE MOVING TO NEXT
BOLT IN SEQUENCE: 1) loosen 2-3 turns,
2) Long bolts 29-37; Short bolts 15-22,
3) turn 175-185 degrees
94
ES 72156
ES 72160
232 OHV (3.8L) 12 Valve Ford 1995 Truck
●❍
1st 15, 2nd 30, 3rd 37,
PERFORM THE NEXT THREE STEPS ON
EACH BOLT BEFORE MOVING TO NEXT
BOLT IN SEQUENCE: 1) loosen 2-3 turns,
2) Long bolts 11-19; Short bolts 7-15,
3) turn 85-95 degrees
94
ES 72131
232 OHV (3.8L) 12 Valve Ford 2004-98 Car
●❍
1st 15, 2nd 30, 3rd 37,
PERFORM THE NEXT THREE STEPS ON
EACH BOLT BEFORE MOVING TO NEXT
BOLT IN SEQUENCE: 1) loosen 2-3 turns,
2) Long bolts 29-37; Short bolts 15-22,
3) turn 180 degrees
94
ES 72160
232 OHV (3.8L) 12 Valve Ford 1997-96 Car
●❍
1st 15, 2nd 30, 3rd 37,
PERFORM THE NEXT THREE STEPS ON
EACH BOLT BEFORE MOVING TO NEXT
BOLT IN SEQUENCE: 1) loosen 2-3 turns,
2) Long bolts 30-37; Short bolts 15-22,
3) turn 175-185 degrees
94
ES 72156
ES 72160
232 OHV (3.8L) 12 Valve Ford 1995-94 Car
●❍
1st 15, 2nd 30, 3rd 37,
PERFORM THE NEXT THREE STEPS ON
EACH BOLT BEFORE MOVING TO NEXT
BOLT IN SEQUENCE: 1) loosen 2-3 turns,
2) Long bolts 11-19; Short bolts 10-15,
3) turn 85-95 degrees
94
ES 72131
232 OHV (3.8L) 12 Valve Ford 1993-91 Car
●❍
1st 37, 2nd 45, 3rd 52, 4th 59,
PERFORM THE NEXT THREE STEPS ON
EACH BOLT BEFORE MOVING TO NEXT
BOLT IN SEQUENCE: 1) loosen 2-3 turns,
2) 11-18, 3) Long bolts turn 85-105 degrees
;
Short bolts turn 65-85 degrees
94
ES 72131
232 OHV (3.8L) 12 Valve Ford 1990-84 Car
●❍
Flanged Hex Head bolts: 1st 37, 2nd 45,
3rd 52, 4th 59, PERFORM THE NEXT
THREE STEPS ON EACH BOLT BEFORE
MOVING TO NEXT BOLT IN SEQUENCE:
1) loosen 2-3 turns, 2) 11-18,
3) Long bolts turn 85-105 degrees;
Short bolts turn 65-85 degrees
82
ES 72129
ES 72131


