6 Maintenance
6.1 Defrosting with NoFrost
The NoFrost system automatically defrosts the appliance.
Refrigerator compartment:
The defrost water evaporates due to the compressor heat.
Drops of water on the rear wall are perfectly normal.
u
Regularly clean the drain opening to allow the water to flow
away (see 6.2) .
Freezer compartment:
The moisture condenses on the evaporator, is periodically
defrosted and evaporates.
u
The appliance does not have to be manually defrosted.
6.2 Cleaning the appliance
CAUTION
Risk of injury and damage as a result of hot steam!
Hot steam may damage the surfaces and cause burns.
u
Do not use any steam cleaners!
NOTICE
Incorrect cleaning damages the appliance!
u
Do not use cleaning agents in concentrated form.
u
Do not use any scouring or abrasive sponges or steel wool.
u
Please do not use any aggressive, scouring, sand-,
chloride-, chemical- or acid-based cleaning agents.
u
Do not use chemical solvents.
u
Do not damage or remove the type plate on the inside of the
appliance. It is important for the customer service.
u
Do not pull off, bend or damage cables or other compo-
nents.
u
Do not allow any cleaning water to enter the drain channel,
ventilation grille or electrical parts.
u
Please use soft cleaning cloths and a universal pH-neutral
cleaning agent.
u
Please use cleaning and care products suitable for contact
with foodstuffs in the appliance interior.
u
Empty appliance.
u
Pull out the power plug.
u
Clean plastic outer and inner surfaces with lukewarm
water and a little washing-up liquid.
NOTICE
The stainless steel doors are finished with a high quality
surface coating and must not be treated with the enclosed care
product,
as otherwise the surface coating will be damaged.
u
Please only use a soft clean cloth to wipe the coated door
surfaces. In the case of heavy soiling, use a little water or
neutral cleaning agent. A micro-fibre cloth can be used
optionally.
u
When soiled, clean stainless steel side walls with a
commercially available stainless steel cleaning agent. Then
apply the enclosed stainless steel care product evenly in the
direction of polishing.
u
Use only a soft clean cloth to wipe side walls and door
surfaces with a paint finish. In the case of heavy soiling, use
a little water or neutral cleaning agent. A micro-fibre cloth
can be used optionally.
u
Clean drain hole: Remove deposits
with a narrow instrument, e.g. a
cotton bud.
u
Clean items of equipment by hand with lukewarm water
and a little washing-up liquid.
After cleaning:
u
Wipe dry the appliance and items of equipment.
u
Connect the appliance and switch it on again.
u
Switch on SuperFrost (see 5.4.4) .
When the temperature is sufficiently cold:
u
Put the food back inside.
6.3 Replacing the interior light
Bulb data
q
max. 25 W
q
Bulb fitting: E14
q
Current type and voltage must conform with the data on the
type plate
u
Switch off the appliance.
u
Pull out the mains plug or switch off/unscrew the fuse.
u
Take hold of the lamp cover at
the top and bottom
Fig. 8 (1)
.
u
Disengage the lamp cover at the
back and detach it
Fig. 8 (2)
.
u
Replace the bulb
Fig. 8 (3)
.
Apply slight pressure when turning
the bulb to overcome the friction of
the seal. Pay attention that the seal
is seated properly in the lamp
socket.
u
Clip the back end of the cover in
and clip the sides into place.
Fig. 8
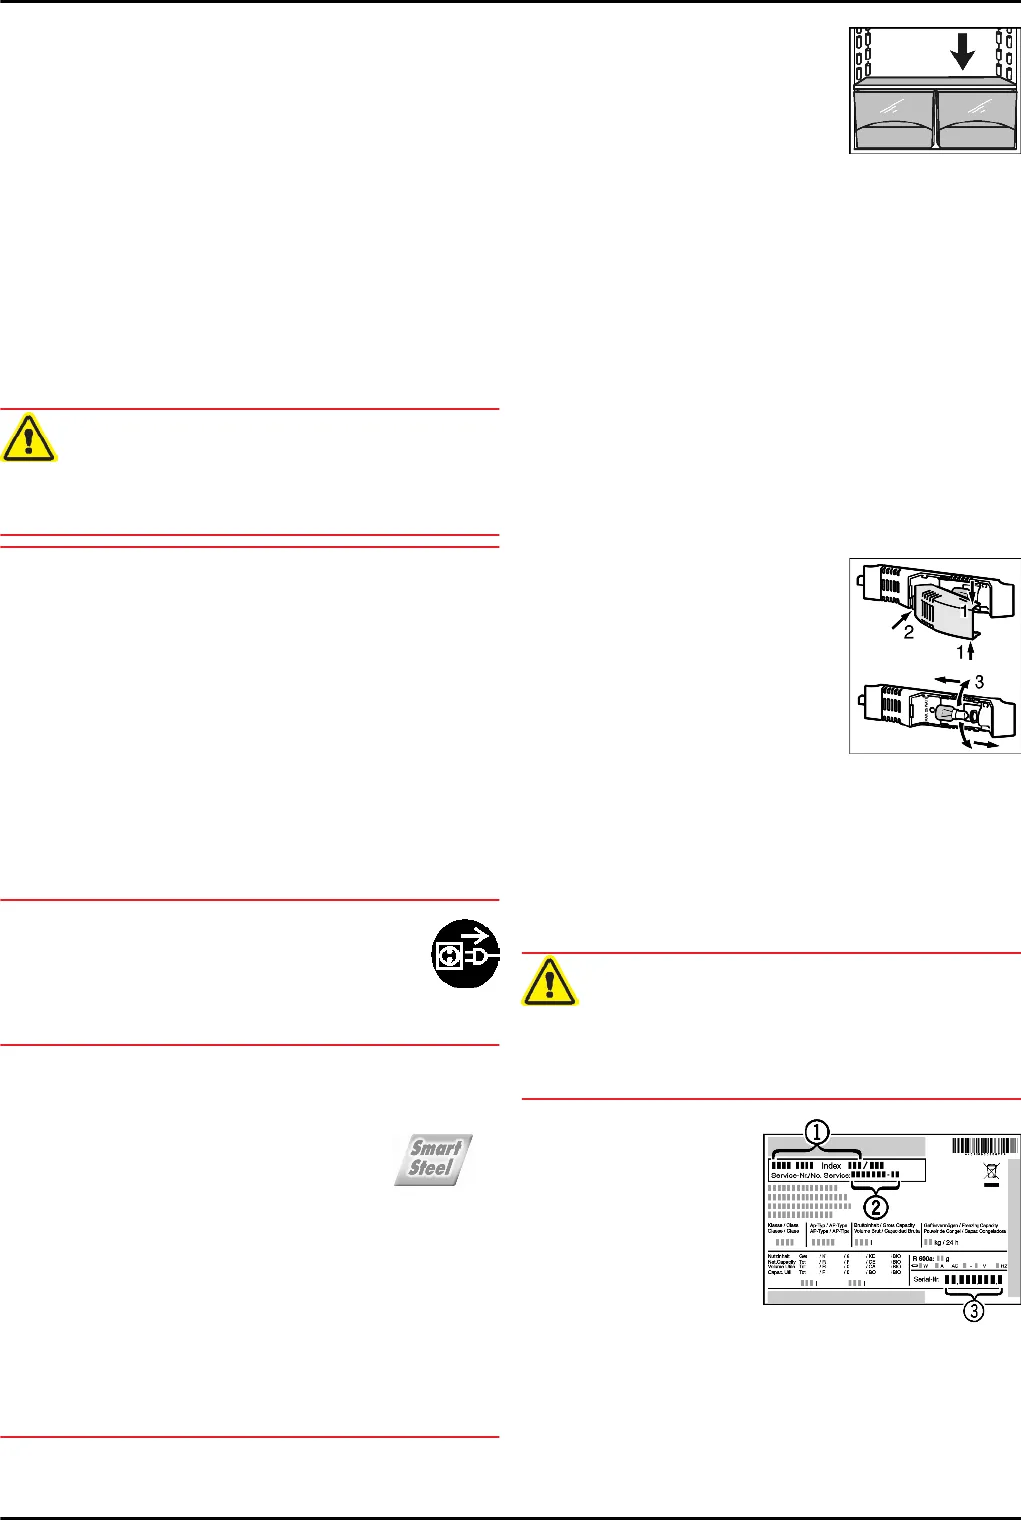
6.4 Customer service
First check whether you can correct the fault yourself by refer-
ence to the list (see Malfunction). If this is not the case, please
contact the customer service whose address is given in the
enclosed customer service list.
WARNING
Risk of injury if repair work is not carried out professionally!
u
Have any repairs and action - not expressly specified - on
the appliance and mains cable carried out by service
personnel only. (see Maintenance)
u
Read the appliance
designation
Fig. 9 (1)
, service
No.
Fig. 9 (2)
and
serial No.
Fig. 9 (3)
off the type plate
located inside the
appliance on the left-
hand side.
Fig. 9
u
Notify the customer service, specifying the fault, appliance
designation
Fig. 9 (1)
, service No.
Fig. 9 (2)
and serial No.
Fig. 9 (3)
.
w
This will help us to provide you with a faster and more accu-
rate service.
u
Keep the appliance closed until the customer service
arrives.
Maintenance
10


