Page 9
WARNING!
Before working on any electrical
appliance, be sure the electrical power has been
turned off at the breaker/fuse box.
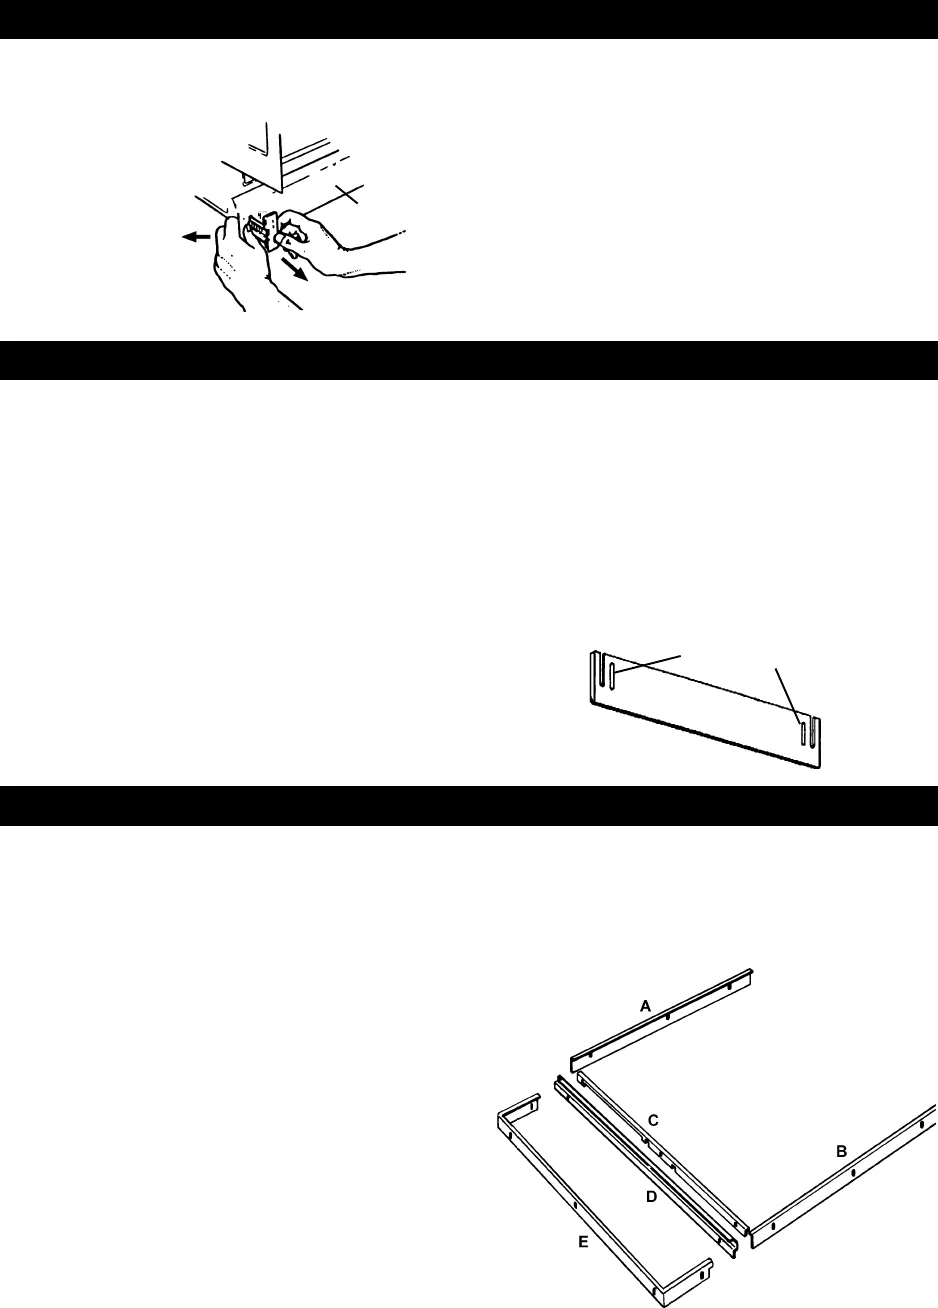
Refer to the illustration at right for instruction references.
1. Remove the lower access panel with standard or
20 torx screwdriver.
2. Using needlenose pliers, remove the plastic plugs
around the edges of the access panel and upper
door panel. You may discard the plugs.
3. Using the screws provided with the trim kit, loosely
secure parts A and C to the upper door panel.
4. Slide the upper panel into the trim kit grooves.
5. Tighten the screws holding parts A and C.
6. Secure part B and tighten screws.
7. Loosely screw part E to the lower access panel.
8. Slide the custom panel into trim kit channels and
tighten the screw to part E.
9. Secure part D of the trim kit and tighten the screws.
10. Secure the lower access panel to the dishwasher.
11. Drop the access panel to line up with the lower
holes on the guard plate.
After you replace the guard plate (see page 7), you need
to replace the toe kick brackets. While holding the spring
tab on the base pan toward the outside of the machine,
slide the bracket into the
slots on the guard plate
and work it between
the guide slots on
the base pan.
Adjusting the Height onAdjusting the Height on
Adjusting the Height onAdjusting the Height on
Adjusting the Height on
Models 1805FI and 1895Models 1805FI and 1895
Models 1805FI and 1895Models 1805FI and 1895
Models 1805FI and 1895
These models come with two toe kicks. Use the
mounted toe kick if the machine will be 32-1/2” to
33-1/2” high. If it will be higher, use the toe kick
packed inside the dishwasher.
The toe kick has extended screw slots that allow you to
adjust the height. Position the toe kick so it touches the
floor and tighten the screws.
Once you have the toe kick bracket in place, you can
install the toe kick, as follows:
1. If you have not done so, remove the toe kick and felt
insulation from the brown paper packaging.
2. Lay the insulation on the back side of the toe kick to
make sure it fits properly.
3. Peel the adhesive protection strip off the insulation
and press it firmly to the back side of the toe kick,
making sure you don’t cover any slots on the toe
kick.
4. Positioning the notches on the toe kick at the edge
of the access panel, slide the toe kick up behind
the access panel then let it slide to the floor.
5. Screw the toe kick to the toe kick brackets.
Panel Trim Kit
NOTE:
The stainless steel panels do not have holes
for custom trim. You have to drill the holes.
After you install the front panels, you should test the
door before you push the dishwasher into the cabinet
opening. If the door doesn’t open properly, you may
need to adjust the door springs (see page 10).
Guard plate
CHANGING CHANGING
CHANGING CHANGING
CHANGING
THE FRTHE FR
THE FRTHE FR
THE FR
ONT PONT P
ONT PONT P
ONT P
ANELSANELS
ANELSANELS
ANELS
INSTINST
INSTINST
INST
ALLING ALLING
ALLING ALLING
ALLING
THE THE
THE THE
THE
TT
TT
T
OE KICKOE KICK
OE KICKOE KICK
OE KICK
REPLAREPLA
REPLAREPLA
REPLA
CING CING
CING CING
CING
THE THE
THE THE
THE
TT
TT
T
OE KICK BRAOE KICK BRA
OE KICK BRAOE KICK BRA
OE KICK BRA
CKETSCKETS
CKETSCKETS
CKETS
NOTE:
Make sure the toe kick bracket is securely
inside the guides on the base pan.
Extended screw slots
Adjusting the Bracket DepthAdjusting the Bracket Depth
Adjusting the Bracket DepthAdjusting the Bracket Depth
Adjusting the Bracket Depth
You will have to adjust the bracket depth to allow for the
thickness of the toe kick. To do this, first measure the
thickness of the toe kick. Then press the spring tab on
the sides of the base pan toward the outside of the
machine and carefully pull or push the bracket to the
required depth less the thickness of the toe kick.


