ECLIPSE
9
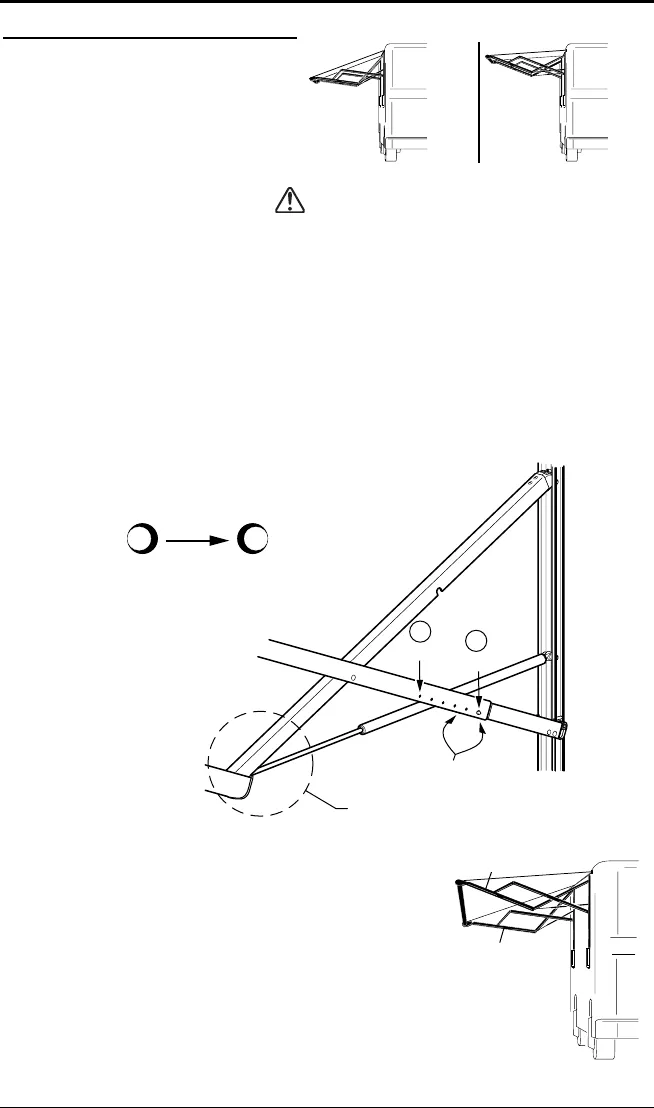
ADJUSTING THE PITCH
The Eclipse arms have 6 pitch
adjustment settings from minimum
pitch (setting #1) to maximum pitch
(setting #6). The awning can be
extended and retracted in any of these
positions without having to reset the
pitch between uses.
CAUTION
BE CAREFUL WHEN ADJUSTING THE PITCH AS THE AWNING MAY MOVE ABRUPTLY.
1. Extend the awning completely. It is easier to adjust the pitch when the
awning is fully extended.
2. Hold on to the arm of the awning to keep it steady while adjusting the pitch.
3. Press the pitch adjustment pins, located on the long scissor arm. There are two
pins: one in the outer channel (shown) and one in the inner channel.
Tip: Applying
LIGHT pressure on the arm will decrease the force required to
press the pitch adjustment pins.
4. Slide the outer scissor arm to the desired set of holes—towards the coach
for a lower pitch and away from the coach for a higher pitch.
Pitch Adjustment Pins
(one on each side)
Support and Lift in this area
Lift up
when pin is
at front of hole
Pull down
when pin is
at back of hole
Pitch Adjustment Pin Tip
(refer to tip in step 3)
Wall
E0017
Min.
Max.
1
6
RAIN RELEASE SETTING
The effects of wind and rain on an awning are
unpredictable. Severe damage to the awning and/or
the vehicle may result. IF WIND OR EXTENDED PERIODS OF
RAIN ARE EXPECTED
, ROLL UP THE AWNING AND SECURE.
If the awning is extended during rain, position one arm at
minimum pitch and the other arm at maximum pitch. This
provides slope to allow the water to run off.
Note: The awning can be retracted with the arms
set in the release setting. The pitch does not have
to be equalized before closing.
E0017a
Maximum
Pitch
Minimum
Pitch
Maximum
Pitch
Minimum
Pitch
E0042


