-2-
I. f–ENABLE-DISABLE LABEL PRINTER (cont’d):
To enter from the keypad, press “MORE” from the “MAIN
MENU”. Press “SETUP”, and change the “PASSWORD
(PIN)” to “85”. Press and hold the upper left, upper right
and lower right keys simultaneously. Then release all
keys. Display will read as follows:
Press “NEXT”, this will bring you to the Label Printer
option screen:
Press the up or down arrow to toggle between “LABEL
PRINTER (NO)” and “LABEL PRINTER (YES)”.
Press “NEXT” until you reach the screen with “EXIT” op-
tion. Press “EXIT” then press “YES” to save settings.
II. a–CHECK RECORD PRINTER MEDIA:
The record printer must be loaded with 2 ¼” thermal
paper. The thermal side must be facing up.
Verify paper has thermal coating by running a blunt ob-
ject across the thermal coating. The friction will create
enough heat to leave markings on the thermal coated
side.
II. b–CHECK LABEL PRINTER MEDIA:
The Label printer must be loaded with 2 ¼” Traulsen
label stock, part number 400-60004-00. Labels must
be facing up.
Traulsen label stock can be identied by the ½” or by
¼” black place marker on the top right corner of each
label.
I. GENERAL INFORMATION (cont’d)
II. c–LOADING THE PRINTER MEDIA:
• Place printer media on spindle (see gure 1; reference 7).
• Fold the end of the printer media to a centered point allows
smoother transition when feeding (see gure 1; reference 4).
• Lift the cutting wheel cartridge (see gure 1; reference 3) and
release the feed roller tension arm (see gure 1; reference 6).
• Feed the printer media over the feed roller (see gure 1; refer
ence 5) and through the cutting wheel cartridge.
NOTE: Thermal coating side must face up.
• Engage feed roller tension arm and cutting wheel cartridge.
II. d–RUNNING A TEST PRINT:
• Start at the “MAIN MENU”
• Press “MORE”
• Press “SET UP”
• Change “PASSWORD (PIN)” to “75”
• Press the top left, top right and the bottom right buttons
simultaneously and release to enter the “SERVICE MENU”
• Press “NEXT”
• Select “PRINTERS”
• Press “RECORD READY” or “LABEL READY” for a test print.
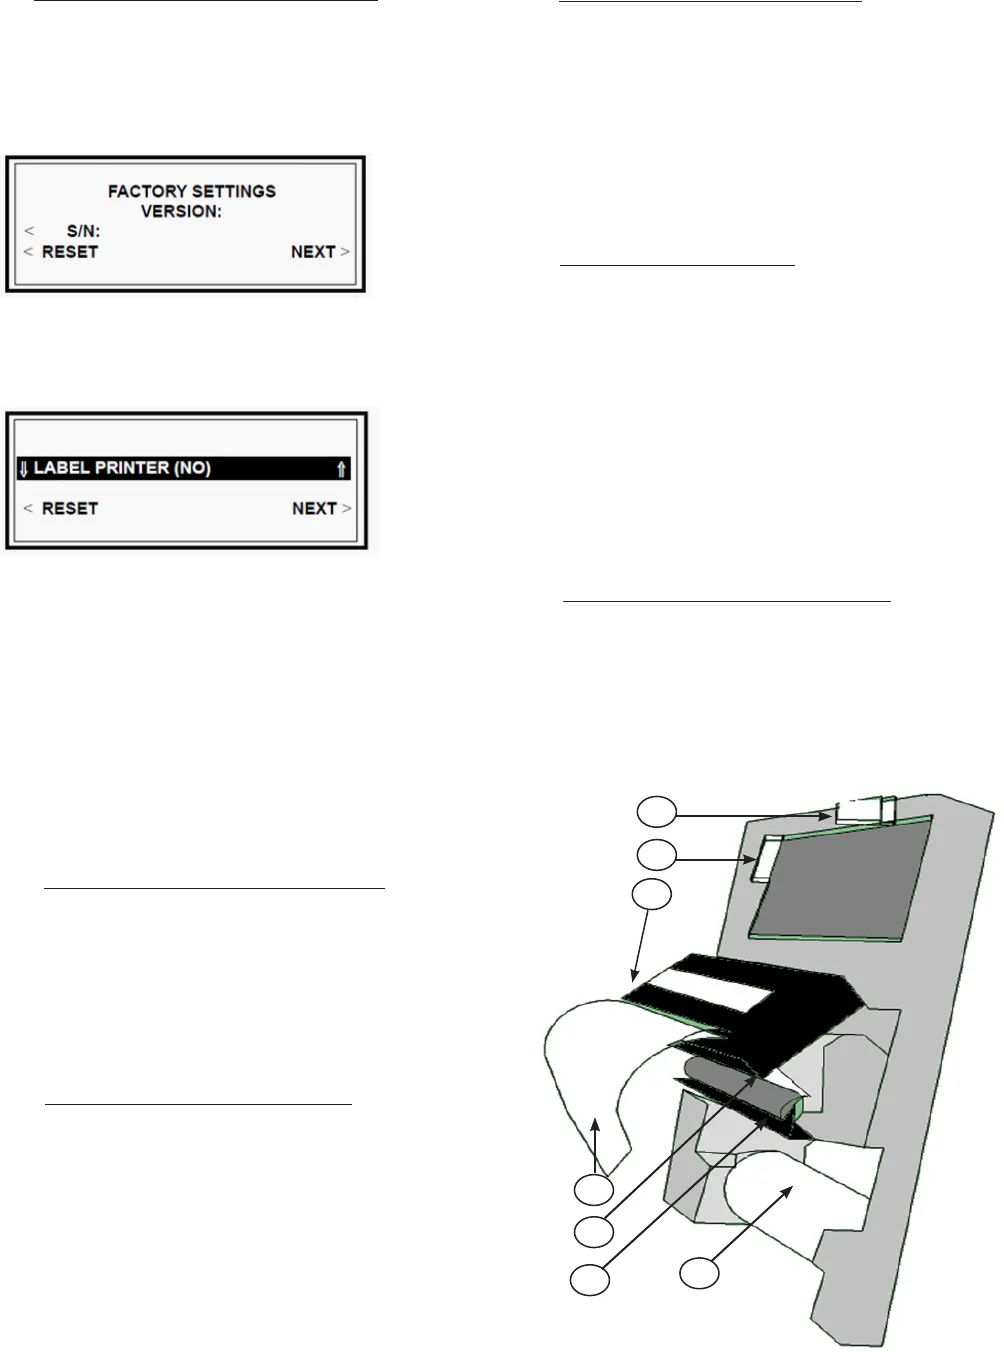
III. a-PRINTER COMPONENT DIAGRAM:
Reference 1=Printer Power Port-Red Harness
Reference 2=Printer Data Port-White Harness
Reference 3=Cutting Wheel Cartridge
Reference 4=Paper Folded To Point For Easy Feed
Reference 5=Feed Roller
Reference 6=Feed Roller Tension Arm
Reference 7=Thermal Paper Or Label Stock
II. BASIC SERVICE PROCEDURES
& ADJUSTMENTS:
II. BASIC SERVICE PROCEDURES
& ADJUSTMENTS (cont’d)
1
2
3
4
5
6
7
Figure 1
III. PRINTER COMPONENT DIAGRAM


