-7-
SETTING UP THE L-350 TO APPLY STAMPS
ROLL OF STAMPS
1. Install the TR-10 Reel Assembly on
the machine by hooking the rear
bracket to the center tie bar of the
head assembly. Pivot the reel
assembly forward to seat the front
bracket over the front tie bar of the
head assembly.
NOTE: In order to run the stamp at a
position within 1/4” of the edge of
the media, install the 90-103-02B
Right Side Guide supplied with the
machine. This guide will permit the
positioning of the stamp at the top
edge of the media.
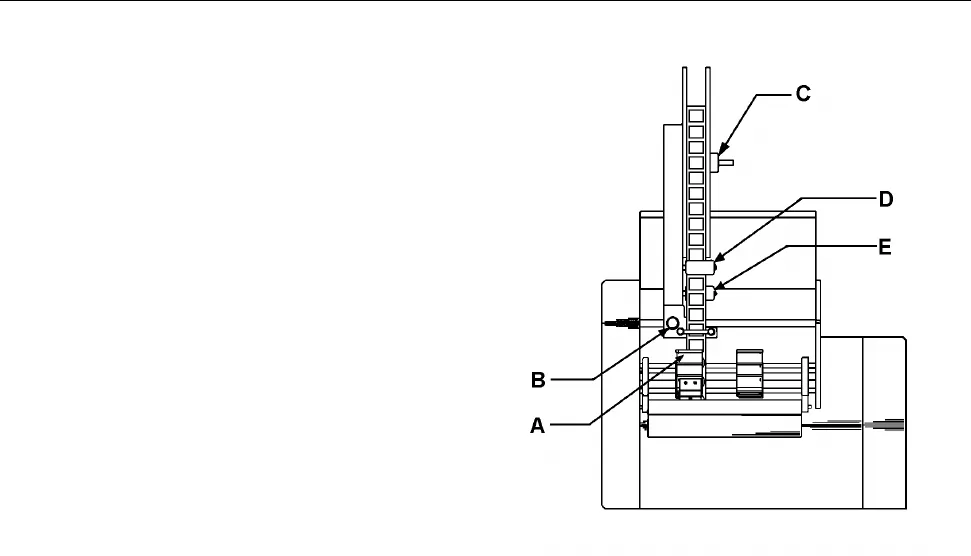
2. To position the reel, slide the whole
assembly on the tie bars until the
tracking guides [Figure 7A] are over the
desired location of the stamp. Lock the reel in place with the thumbscrew [Figure
7B].
3. Remove the Reel support guide [Figure 7C] by pulling it off the reel shaft.
4. Mount a spool of stamps so it unwinds in a counterclockwise direction with the
stamps facing up. Reinstall the support guide removed in step 4.
5. Route the stamp supply around the brake roller [figure 7D] to the guide roller [Figure
7E] in such a manner that the stamps contact the brake roller while the backing
paper contacts the guide roller.
6. Loosen the two tracking guide screws and separate the guides. Route the stamp
supply between the guides and clamp support rails.
7. Remove the first nine inches of stamps from the backing paper to form a leader.
8. Disengage the label advance rollers [Figure 4A] by turning LABEL PRESSURE knob
[Figure 3A] clockwise to the OFF position.


