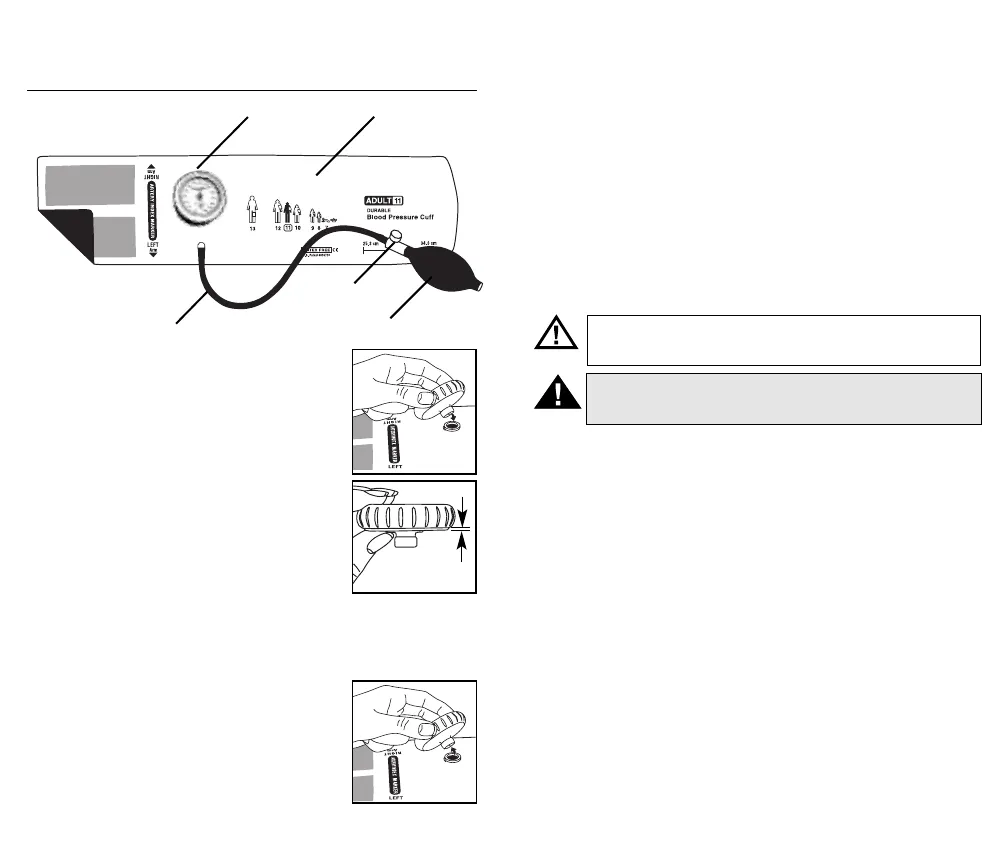
Components of the DuraShock
™
Integrated Aneroid Sphygmomanometer
Assembly Instructions
1. Attach the gauge to the cuff by pressing the gauge stem
into the cuff port until you feel it engage. The gauge can
be rotated 360° in the cuff port to improve your view of
the dial face during readings.
2. Push the remaining smaller-diameter barb of the valve
onto the tube.
NOTE: To assemble the bumper to a DuraShock
integrated gauge, gently slide bumper over the gauge
until the bumper just contacts the crystal around the
entire circumference. Do not force to the point where the
bumper shape is deformed, as this will reduce the shock-
resistant properties of the bumper. Properly assembled,
about 1/16-inch (2 mm) of the gauge will be visible below
the bumper when viewed from the side (see illustration).
Inflation System Change and
Replacement
The DuraShock integrated blood pressure gauge connects effortlessly to the inflation
system via a unique port connection. Therefore, only integrated one-piece blood pressure
cuffs can be used with the DuraShock integrated blood pressure gauge.
1. To remove the inflation system, simply grasp the gauge
and pull away from the cuff. Rotating the gauge as it is
being pulled away from the cuff will make removal easier.
2. To attach a new or different size blood pressure cuff,
simply press the gauge stem into the cuff port until you
feel it engage. Rotating the gauge as it is being pressed
into the cuff will make insertion easier.
Patents: 5,966,829; 6,036,718; 6,082,170; 6,120,458; 6,168,566;
6,234,972. Additional patents pending.
©
2001 Welch Allyn, Inc. All rights reserved. Welch Allyn
®
and DuraShock
™
are trademarks of Welch Allyn, Inc.
Operating Instructions
Auscultatory Method
1. Select cuff size appropriate for the patient’s arm circumference. The applicable range,
in centimeters, is printed on each cuff.
Note: The “Artery Index Marker” on the cuff should fall within the “Range” indicated on
the cuff. If the artery index marker falls short of range, a larger cuff should be used to
ensure accurate results. If the artery index marker is past the range, a smaller cuff
should be used to ensure accurate results.
2. Wrap the cuff around the arm with the artery index marker located over the brachial
artery and with the lower edge of the cuff 1-inch (2.5 cm) above the bend in the elbow.
3. Inflate cuff rapidly to a level 30 mm Hg above estimated (or palpatory) systolic
pressure.
4. Partially open the valve to allow deflation at a rate of 2 to 3 mm Hg per second.
5. As the pressure falls, note systolic pressure and diastolic pressure with your
stethoscope.
6. Rapidly release the remaining pressure and record measurements immediately. After a
minimum of 30 seconds, repeat the above steps for a second reading.
How to Clean, Disinfect, and Sterilize the
DuraShock
™
Sphygmomanometer
Cleaning
Aneroid Gauge, Inflation Bulb, and Valve: Clean the aneroid gauge, inflation bulb, and
valve by wiping with slightly dampened cloth or alcohol pad.
Integrated One-Piece Cuff: Cuffs may be safely cleaned with a damp cloth (70% alcohol
or 0.5% bleach solution may be used) or washed in warm water (140°F, 60°C maximum)
with mild detergent. Before laundering the cuff:
1. Remove the inflation bulb and valve.
2. Close off the end of the tubing with Tube Plug Accessory (part no. 5082-163).
3. Close off the cuff port with Cuff Port Laundering Plug (part no. 5082-250).
4. Place the hook & loop fasteners in the closed position.
5. Machine launder using gentle cycle, warm water, and mild detergent.
6. Air dry completely and reassemble components.
DO NOT PRESS WITH HOT IRON.
Disinfecting
Glutaraldehyde-type liquid disinfectants may be used on the durable one-piece cuff.
Follow instructions for use provided with the Glutaraldehyde product. Prolonged use of
these disinfectants may cause discoloration. Do not use glutaraldehyde-type liquid
disinfectants on the aneroid gauge, bulb, valve, or tubing.
Sterilizing
The durable integrated blood pressure cuff may be gas sterilized. Do not use steam or
heat to sterilize the cuff, bulb, valve, or tubing. Do not attempt to sterilize the aneroid
gauge.
Tubing
Integrated
One-Piece Cuff
Inflation Bulb
Gear-free Gauge
Snaps into Cuff
Valve
1/16 inch
WARNING: If luer lock connectors are used in the construction of tubing, there is
a possibility that they might be inadvertently connected to intravascular fluid
systems, allowing air to be pumped into a blood vessel.
CAUTION: Do not allow a blood pressure cuff to remain on patient for more than
10 minutes when inflated above 10 mm Hg. This may cause patient distress,
disturb blood circulation, and contribute to the injury of peripheral nerves.