16
Quick Start
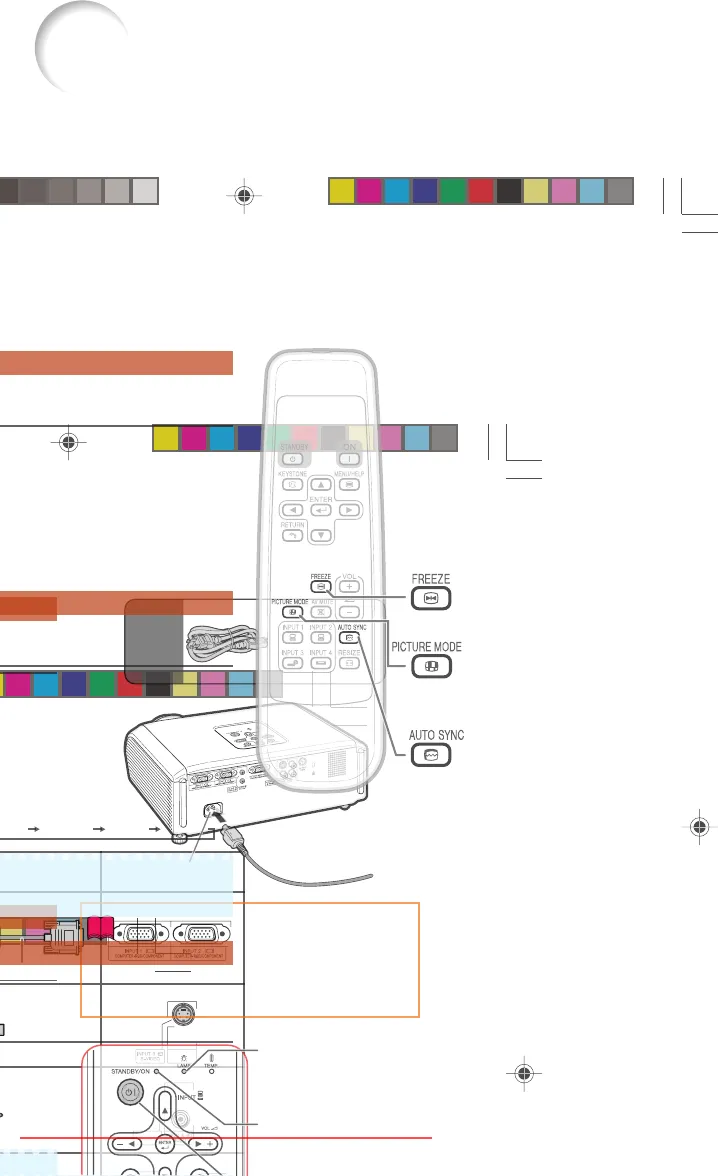
This section shows the basic operation (projector connecting with the video equipment). For details,
see the page described below for each step.
Setup and Projection
In this section, connection of the projector and the video equipment is explained using one ex-
ample.
3. Remove the lens cap and turn the projector on
2. Connect the projector to the video equipment and plug the power
cord into the AC socket of the projector
× PP. 22Ð28
× P. 28
5
3
7
8
3
7
5
8
6
6
1. Place the projector facing a wall or a screen
× P. 18
6
XV-Z100_EN_e 05.8.25, 5:52 AM16
Downloaded From projector-manual.com Sharp Manuals
18
Ceiling-mount Setup
It is recommended that you use the optional
Sharp ceiling-mount bracket for this installa-
tion. Before mounting the projector, contact
your nearest Sharp Authorized Projector
Dealer or Service Center to obtain the rec-
ommended ceiling-mount bracket (sold sepa-
rately).
• AN-60KT ceiling-mount bracket, its AN-
TK201 and AN-TK202 extension tubes.
Invert the image by setting “Ceiling + Front”
in “PRJ Mode”. See page 43 for use of this
function.
Setting up the Projector
Setting up the Projector
For optimal image quality, position the projector perpendicular to the screen with the projector’s feet
flat and level. Doing so will eliminate the need for Keystone correction and provide the best image
quality. (See page 33.)
Side View
Standard Setup (Front Projection)
Place the projector at the required distance from the screen according
to the desired picture size. (See page 20.)
Example of standard setup
Screen
Lens center
¥ Refer to page 20 for additional information concerning ÒScreen Size and Projection DistanceÓ.
Note
Downloaded From projector-manual.com Sharp Manuals
22
Samples of Cables for Connection
Cables for a camera
or a video game
Equipment
Input
Signal
Cable
Terminal on the
projector
S-video cable (commercially available)
Video cable (supplied)
Audio-visual
equipment
Camera/
video game
S-video
S-video
Compo-
nent
video
Video
Audio
Cables for a camera or a video game
ø3.5 mm minijack to RCA audio cable
(commercially available)
INPUT3
INPUT4
AUDIO INPUT
INPUT1, 2
INPUT3
Video
Audio
Cables for a camera
or a video game
Cables for a camera or a video game/ø3.5
mm minijack to RCA audio cable (commer-
cially available)
INPUT4
AUDIO INPUT
Component cable (commercially available)
Compo-
nent
video
INPUT1, 2
¥
For more details of connection and cables, refer to the operation manual of the connecting equipment.
¥ You may need other cables or connectors not listed below.
RCA adaptor plug
(commercially available)
or
or connect directly to
AUDIO (INPUT 3, 4).
or
or
ø3.5 mm stereo audio cable
(commercially available or available as Sharp
service part QCNWGA038WJPZ)
RGB cable (commercially available)
Computer
RGB
video
Computer
audio
INPUT1, 2
AUDIO INPUT
3 RCA to 15-pin D-sub adaptor (supplied)
3 RCA to 15-pin D-sub adaptor (supplied)
XV-Z100_EN_g 05.8.25, 5:53 AM22
Downloaded From projector-manual.com Sharp Manuals
28
Turning the Projector On/Off
Remove the lens cap and press
S STANDBY/ON on the projector or
f ON on the remote control.
About the Lamp Indicator
Green:
Blinking in green:
Red:The lamp is shut down abnormally
or the lamp should be replaced.
Note
43
Info
Note that the connections to external equip-
ment and power outlet should be done be-
fore performing the operations written be-
low. (See pages 23 to 28.)
Plug the supplied power cord into the AC
socket on the rear of the projector.
XV-Z100_EN_h 05.8.25, 5:54 AM28
Downloaded From projector-manual.com Sharp Manuals
36
Operating with the Remote Control
Freezing a Moving Image
Press FREEZE.
¥ The projeχted image is frozen.
Press FREEZE again to return
to the moving image from the cur-
rently connected device.
1
2
Selecting the Picture Mode
Press PICTURE MODE.
¥ Ωhen pressing PICTURE MODE, the piχture
mode χhanges in the following order:
You can select the appropriate picture
mode to best match the projected im-
age you are watching.
¥ See page 41 for details on the piχture mode.
Note
FREEZE button
AUTO SYNC
button
PICTURE MODE
button
Auto Sync
(Auto Sync Adjustment)
¥ Ωhen the optimum image χannot be aχhieved
with Auto Synχ adjustment, use the help menu
for manual adjustments. (See page 46.)
Auto Sync function works when detect-
ing input signal after the projector turns
on.
Press AUTO SYNC to manually ad-
just with Auto Sync function.
Note
Standard Natural Dynamic Movie1 Movie2
XV-Z100_EN_i 05.8.25, 5:55 AM36
Downloaded From projector-manual.com Sharp Manuals
58
Specifications
Projector
XV-Z100
NTSC3.58/NTSC4.43/PAL/PAL-M/PAL-N/PAL-60/SECAM/DTV480I/DTV480P/
DTV540P/DTV576I/DTV576P/DTV720P/DTV1035I/DTV1080I/DTV1080I-50
Single Chip Digital Micromirror Device
TM
(DMD
TM
) by Texas Instruments
Panel size: 0.53
"
, 1chip DMD
No. of dots: 409,920 dots (854 [H] × 480 [V])
1–1.15 × zoom lens, F2.4–2.6, f = 19.0–21.9 mm
275 W DC lamp
15-pin mini D-sub connector
Y: 1.0 Vp-p, sync negative, 75 Ω terminated
P
B
: 0.7 Vp-p, 75 Ω terminated
P
R
: 0.7 Vp-p, 75 Ω terminated
520 TV lines (DTV720P)
15-pin mini D-sub connector
RGB separate/sync on green type analog input: 0–0.7 Vp-p, positive, 75 Ω terminated
HORIZONTAL SYNC. SIGNAL: TTL level (positive/negative)
VERTICAL SYNC. SIGNAL: Same as above
4-pin mini DIN connector
Y (luminance signal): 1.0 Vp-p, sync negative, 75 Ω terminated
C (chrominance signal): Burst 0.286 Vp-p, 75 Ω terminated
RCA connector: VIDEO, composite video, 1.0 Vp-p, sync negative, 75 Ω
terminated
45–85 Hz
15–70 kHz
12–108 MHz
9-pin mini DIN connector
ø3.5 mm minijack or RCA terminal: 0.5 Vrms, more than 22 kΩ (stereo)
ø3.5 mm minijack: 0.5 Vrms, less than 2.2 kΩ
4 cm × 2.85 cm oval × 1
AC 100–240 V
3.6 A
50/60 Hz
350 W (Lamp Setting “Bright”)/
305 W (Lamp Setting “Eco + Quiet”)
with AC 100 V
330 W (Lamp Setting “Bright”)/
285 W (Lamp Setting “Eco + Quiet”)
with AC 240 V
4 W (AC 100 V) – 5 W (AC 240 V)
1,315 BTU/hour (Lamp Setting “Bright”)/
1,145 BTU/hour (Lamp Setting “Eco + Quiet”) with AC 100 V
1,240 BTU/hour (Lamp Setting “Bright”)/
1,070 BTU/hour (Lamp Setting “Eco + Quiet”) with AC 240 V
41°F to 95°F (+5°C to +35°C)
–4°F to 140°F (–20°C to +60°C)
Plastic
38 kHz
12
13
/32" × 4
19
/64" × 11
1
/32" (315 (W) × 109 (H) × 280 (D) mm) (main body only)
12
13
/32" × 4
47
/64" × 11
37
/64" (315 (W) × 120 (H) × 294 (D) mm) (including adjust-
ment foot and projecting parts)
8.6 lbs. (3.9 kg)
Remote control, Power cord for Europe, except U.K., Power cord for U.K. and
Singapore, Power cord for Australia, New Zealand and Oceania, 3 RCA to 15-
pin D-sub adaptor, 21 pin RCA conversion adaptor, Video cable, Operation
manual
Product type
Model
Video system
Display method
DMD panel
Lens
Projection lamp
Component input signal
(INPUT1/2)
Horizontal resolution
Computer RGB input
(INPUT 1/2)/output
(OUTPUT) signal
S-video input signal
(INPUT 3)
Video input signal
(INPUT 4)
Vertical frequency
Horizontal frequency
Pixel clock
RS-232C terminal
Audio input signal
Audio output signal
(AUDIO OUTPUT 1-4)
Speaker system
Rated voltage
Input current
Rated frequency
Power consumption
Power consumption (standby)
Heat dissipation
Operating temperature
Storage temperature
Cabinet
I/R carrier frequency
Dimensions (approx.)
Weight (approx.)
Replacement parts
As a part of policy of continuous improvement, SHARP reserves the right to make design and
specification changes for product improvement without prior notice. The performance specifica-
tion figures indicated are nominal values of production units. There may be some deviations from
these values in individual units.
XV-Z100_EN_m 05.8.25, 5:59 AM58
Downloaded From projector-manual.com Sharp Manuals


