_____________________________ CRA-200 Quick Installation Guide
___________________________________________________________________________________________________________________
Page: 3 of 7
IMPORTANTSAFETYINSTRUCTIONS
9 Placethisrouteronastablesurface.
9 Onlyusethepoweradapterthatcomeswiththepackage.
Usingadifferentvoltageratingpoweradaptormaydamage
thisATA.
9 DonotusethisATAinhighhumidityorhightemperatures.
9 Donotopenorrepairthecaseyourself.
ConnectingYourVoIPATA
1. Poweroffyournetworkdevices,includingyourmodem
andPC.
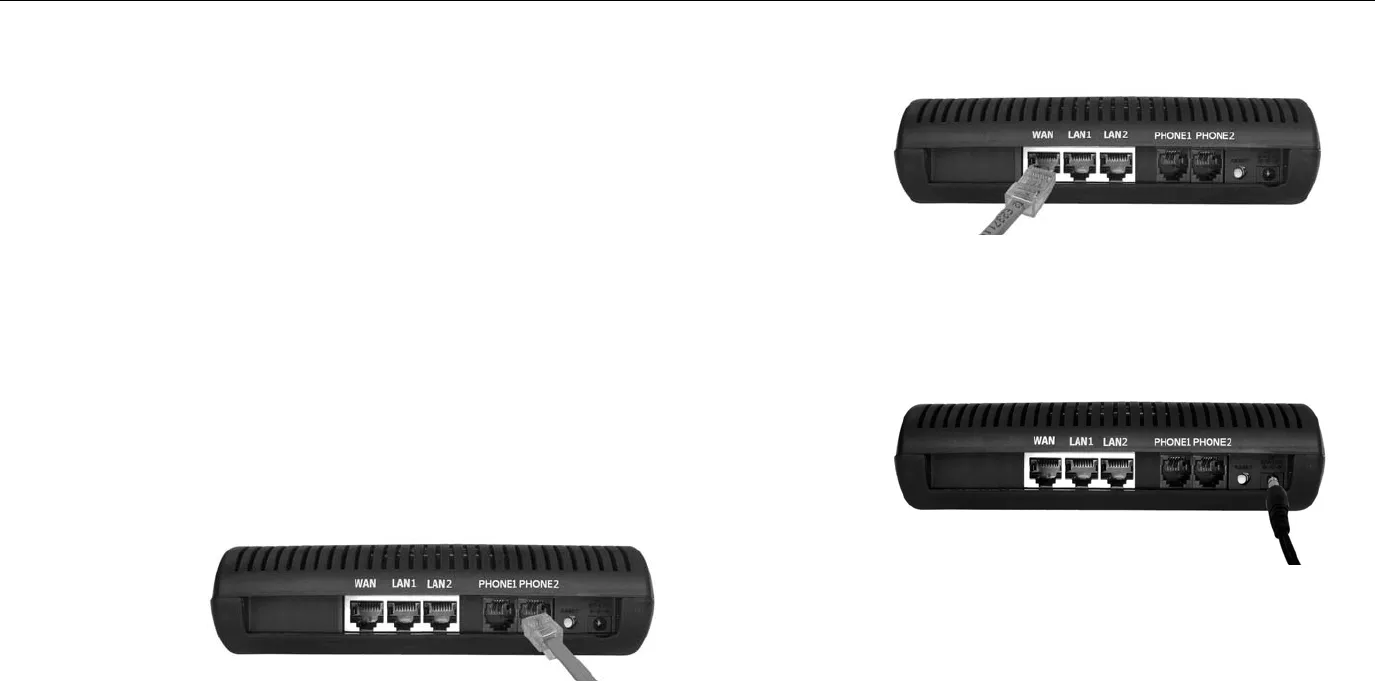
2. ConnectoneendofanRJ‐11phonecabletothePhone
Adapter’sPHONE1port.Connecttheotherendtoyour
analogtelephoneorfaxmachineasshownbelow:
3. ConnectoneendofanEthernetnetworkcabletotheLAN
portoftheATA.ConnecttheotherendtotheEthernet
portofyourPC.
4. ConnectoneendofadifferentEthernetnetworkcableto
theWANportoftheATA.Connecttheotherendtoyour
cable/DSLmodemasshowninbelowfigure
5. Poweronthecable/DSLmodem.
6. ConnecttheincludedpoweradaptertotheATA’spower
port,andthenplugthepoweradapterintoanelectrical
outlet.ThepowerLEDonthefrontpanelwilllightupas
soonasthePhoneAdapterpowerson.
7. PoweronyourPC.MakesureyourPC’sEthernetadapter
issettoobtainanIPaddressautomatically.
NOTE:WaituntilthePOWER,LANandWANLED'sturn
greenandremainstableontheFrontPanelof
yourATA.
AccessingyourATAWebPanel
1. First,connecttheATA’sLANporttoyourPCnetwork
cardandthendisable&enabletheLocalAreaConnection
availableintheControlPanel‐>NetworkConnections.
ThenATAwillreleasetheIPaddressintheseriesof
192.168.113.X.Andthenlaunchthewebbrowseronthe
PC.Enterhttp://192.168.113.1intheAddressfield


